Elementor MCP: Connect Claude and Build Pages with AI
What if you could describe a page to Claude and get a real Elementor page built on your site, ready to edit? That’s exactly what Elementor MCP does.
Elementor MCP is Elementor’s official way to connect AI tools like to your WordPress site. Once it’s connected, Claude can build full pages, edit existing layouts and manage your global colours and fonts. It can also create headers and footers. Everything is saved as a draft, so nothing goes live without your say.
In this guide, you’ll set up Elementor MCP and connect it to Claude step by step. You’ll also learn how to build and refine pages with simple prompts, what Elementor MCP can’t do yet, and how to track every change the AI makes.
What is Elementor MCP and what can it do on your site?
Elementor MCP is an official feature in Elementor that lets AI tools such as Claude, Codex and Cursor build and edit pages on your site. It works with native Elementor Atomic elements, so everything the AI builds stays fully editable in the Elementor editor.
MCP stands for Model Context Protocol, a standard way for AI tools to use tools on another system. Elementor MCP is built on the WordPress Abilities API, which lets WordPress plugins describe what they can do in a way AI tools understand. You can see the full feature list on Elementor’s official Elementor MCP page.
In practice, this gives Claude access to most of the work you’d normally do in the editor.
What Elementor MCP can do
- Build full pages and sections: describe a page and get a complete layout in one step.
- Edit existing pages: redesign or update pages built with Atomic elements.
- Manage your design system: create and apply global variables, global classes and default styles.
- Create theme parts: headers, footers, archives, 404 pages and popups, with display conditions (Elementor Pro).
- Work with components: place existing components, or create new ones with Elementor Pro.
- Use your existing content: place images from your Media Library and connect dynamic content.
You stay in control the whole time. Everything Elementor MCP creates is saved as a draft, and nothing goes live until you publish it.
What do you need before you connect Elementor MCP?
You need an administrator account on a site running Elementor 4.3 or newer, and an AI tool like Claude Desktop. Existing pages must use Atomic (V4) elements for Claude to edit them, and Elementor Pro is only needed for Pro features such as headers, footers, popups and forms.
Before You Start
Elementor 4.3 or newer
An administrator account (Elementor MCP is limited to site admins)
Atomic (V4) elements on any existing pages you want Claude to edit
Claude Desktop installed on your computer
Elementor Pro, if you want headers, footers, popups, forms, loops or components
A staging site and a recent backup
Connecting Elementor MCP itself is free. Your AI tool has its own plan, which is separate from Elementor. Each connection is also set up per site, so if you manage client sites as well as your own, each one gets its own connection.
With those in place, connecting Claude takes only a few minutes.
Notes: Claude’s free plan allows only one custom connector, but Elementor MCP connects through Claude Desktop’s config file instead. Claude Code needs a paid Claude plan. Codex offers limited trial access on its free plan, and Cursor’s free plan has limited agent usage, so larger builds may need a paid plan.
How do you connect Elementor MCP to Claude?
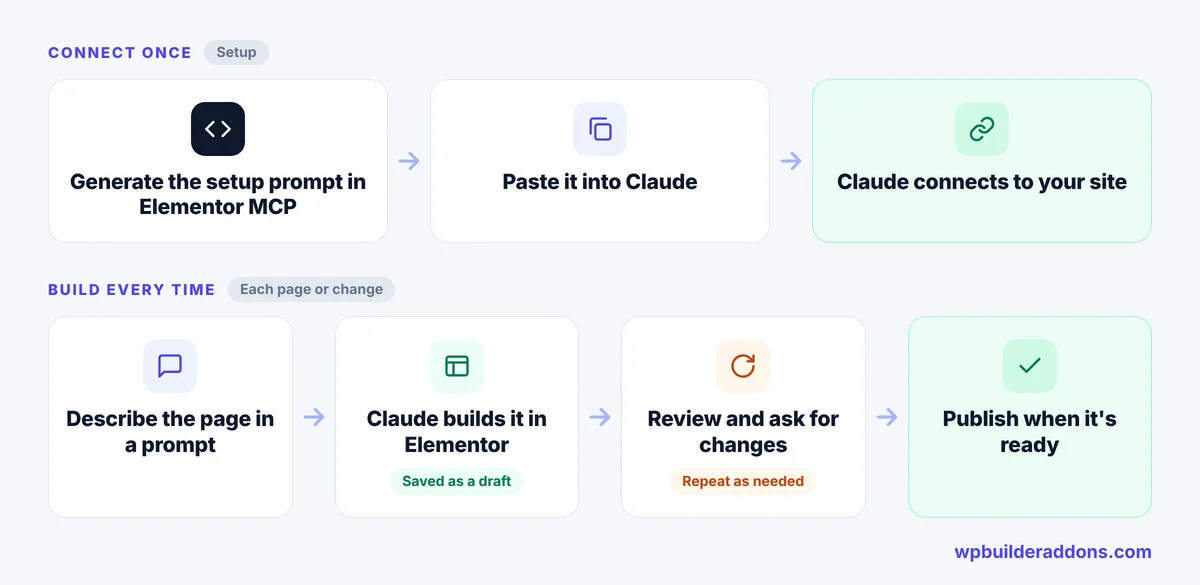
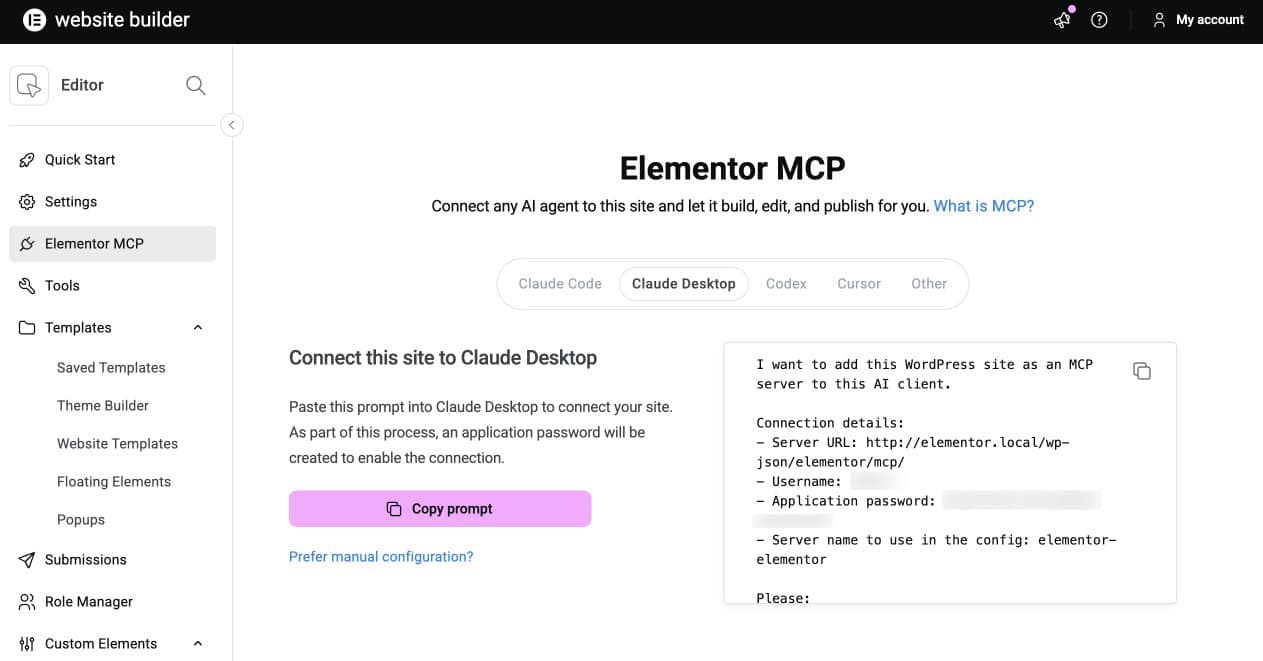
Elementor does most of the setup for you. It generates a ready-made setup prompt with an Application Password already included, so all you do is copy that prompt into Claude and restart it.
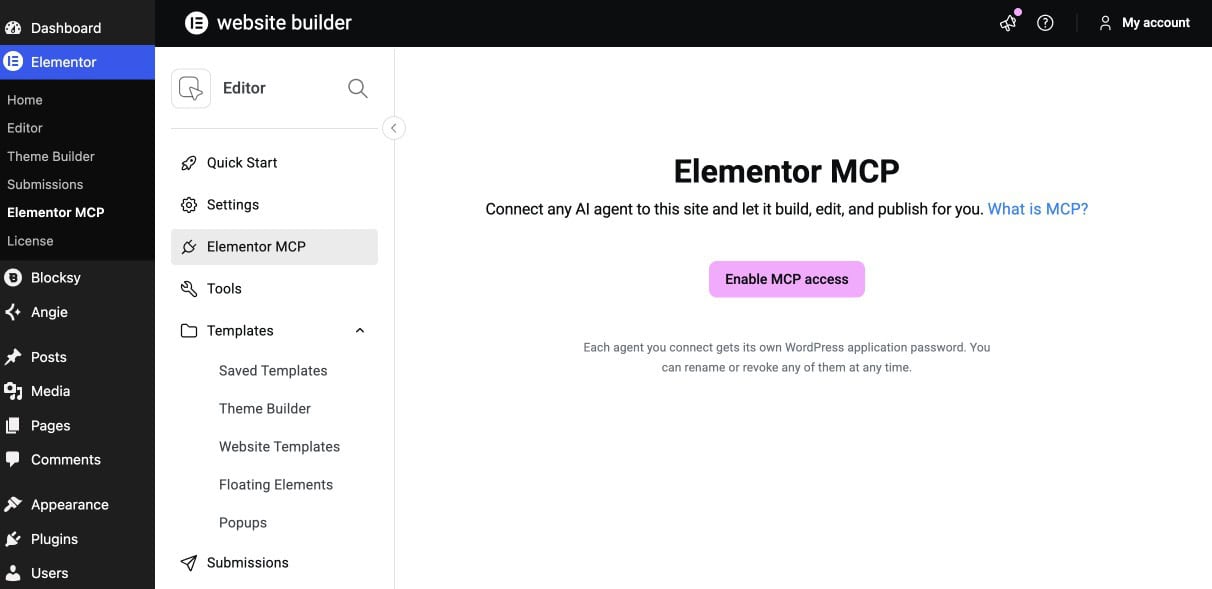
- In your WordPress dashboard, go to Elementor > Elementor MCP.
- Enable MCP Access and choose Claude Desktop as your AI tool.
- Copy the setup prompt Elementor generates. Elementor creates the Application Password in the background and adds it to the prompt.
- Paste the prompt into Claude. Claude will try to add the connection to its config file. If it can’t, it gives you the entry to add yourself under Settings > Developer > Edit Config.
- Fully quit Claude (Cmd+Q on Mac) and open it again. Claude only reads its config file when it starts.
- Go to Settings > Developer in Claude and check that your Elementor server shows as running.
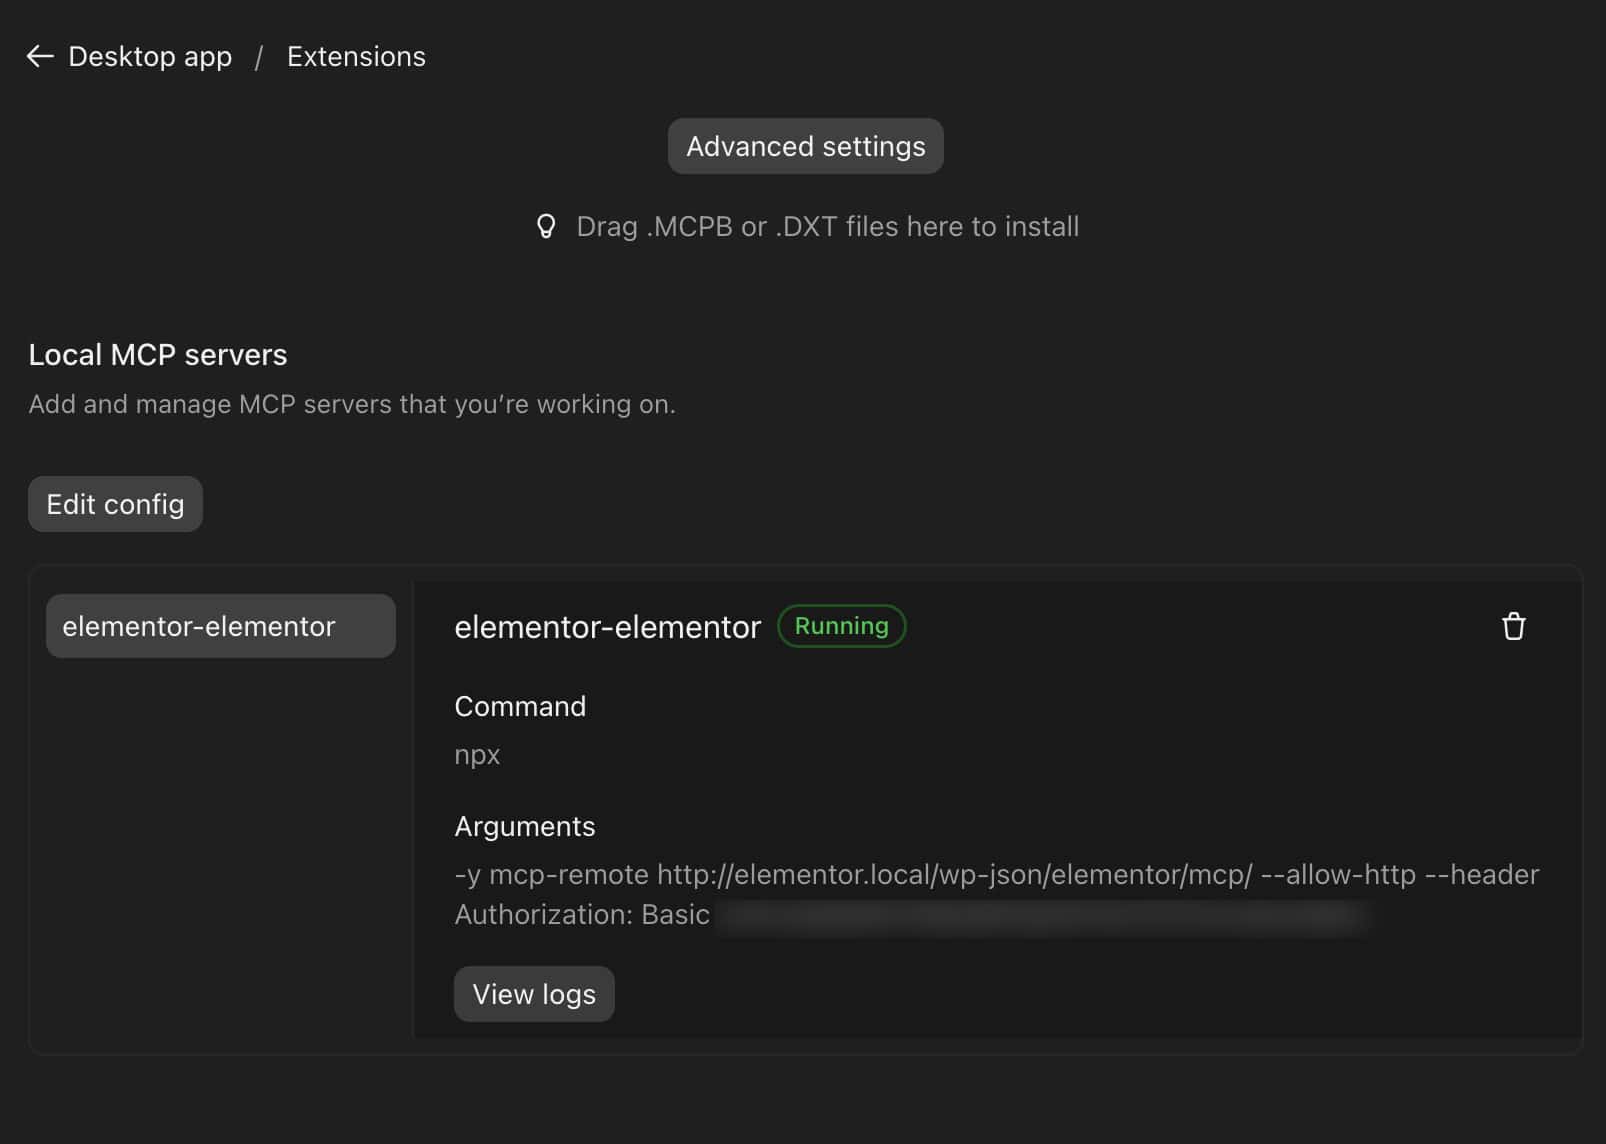
- If you end up adding the entry yourself, it goes inside the
mcpServersblock of Claude’s config file and looks like this:
{
  "mcpServers": {
    "elementor-yoursite": {
      "command": "npx",
      "args": [
        "-y",
        "mcp-remote",
        "https://yoursite.com/wp-json/elementor/mcp/",
        "--header",
        "Authorization: Basic YOUR-ENCODED-CREDENTIALS"
      ]
    }
  }
}
The Authorization line holds your WordPress username and Application Password in encoded form. Elementor fills it in for you, so copy it exactly from the setup prompt.
To confirm everything works, ask Claude something simple, like “How many draft pages are on my site?” If Claude answers with your real pages, the connection is live.
Elementor server not showing up in Claude? Check these three things:
- The entry must sit inside the
mcpServersblock. If it’s outside, Claude ignores it. - Local sites on
http://(likemysite.local) need an extra"--allow-http",line after the site URL, or the connection fails. - Close Claude completely with Cmd+Q, not just the window, so it reloads the config.
Because this connection lets an AI tool work on your site, it’s worth treating its credentials with care.
Important: The setup prompt contains a working password for your site, so treat it like one. To remove Claude’s access at any time, delete the Application Password from Users > Profile > Application Passwords in WordPress.
Using Cursor, Codex or another AI tool?
The same steps work for other AI tools. Pick your tool in the list on the Elementor > Elementor MCP page and follow the same process. Elementor lists Claude Code, Claude Desktop, Codex and Cursor, and the Other option works with any MCP-compatible tool.
Once Claude can see your site, the best way to understand what it can really do is to watch it build something real.
How does an agency build its website with Elementor MCP and Claude?
An agency can go from a written brief to a finished website by describing each page to Claude, reviewing the drafts, and refining them in chat. The order matters most: build the first page, save its look as a reusable brand, then let every new page inherit that brand automatically.
To see how that works, let’s walk through a real build for Codecraft Studio, a web development agency creating its own website on a staging site.
Start with a detailed prompt for the Home page
The first prompt sets the direction for the whole site, so give Claude the full picture: who you are, who you serve, what the page needs and how it should feel. The clearer the brief, the closer the first draft lands.
PROMPT
We are Codecraft Studio, a web development agency that designs and builds WordPress and Elementor websites for small businesses. Our clients want a fast, good-looking website they can update themselves.
Build a Home page for us with a hero section, a short overview of our four services (WordPress development, Elementor website design, WooCommerce stores, website maintenance and support), a “Why clients choose us” section, a “Tech we work with” section, and a “Start your project” call to action.
Use a deep navy and electric blue colour scheme with a clean, modern feel. For images, check our Media Library first. If nothing fits, create a custom illustration. Save the page as a draft.
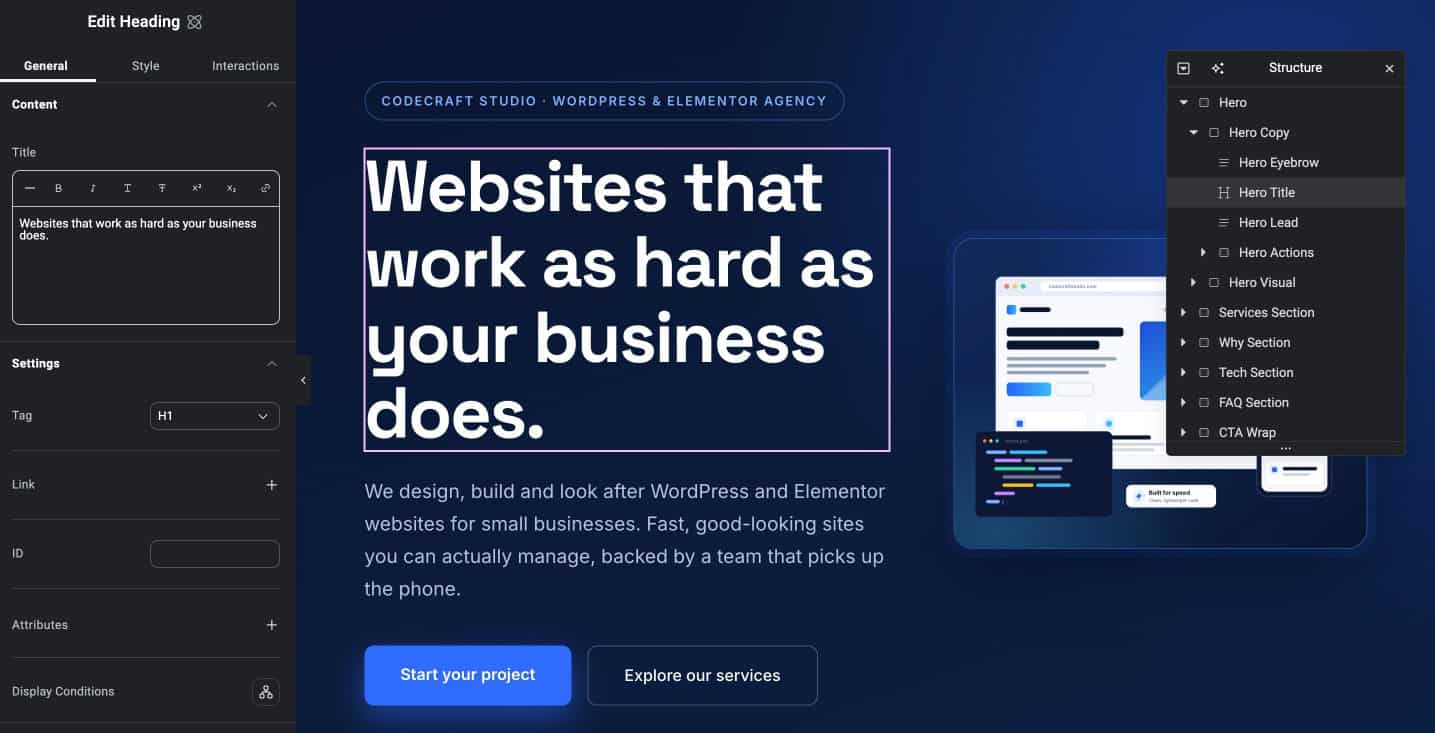
Claude builds the complete page as a draft, using native Elementor elements. Each section gets a clear name in the Navigator panel, so the layout is easy to find your way around when you open it in the editor.
Elementor MCP can place images, but it can’t upload them. When Claude needs an image, it looks in your Media Library and uses the best match it finds. If nothing suits the design, Claude can create a custom illustration for you, but the file still has to reach your Media Library before it can go on the page.
That’s why the image line in the prompt above matters: it tells Claude to check your library first and design something when nothing fits. When Claude creates an illustration, the workflow takes four quick steps.
Notes: Elementor MCP can’t upload images, so Claude only uses images already in your Media Library. Upload your photos first, or ask Claude to create a custom illustration, then upload it and ask Claude to place it on the page.
Save Your Brand as Global Variables and Classes
Once the Home page looks right, turn its style into a reusable brand. Right now its colours and fonts only live on that one page. Saving them as global variables and classes means every future page can use them without you describing the style again.
PROMPT
Save the colours and fonts used on our Home page as global variables, and create reusable global classes for our buttons and cards. Then update the Home page to use them.
Claude creates the variables and classes and connects them to the Home page. From then on, your brand lives in one place: change a variable, and every element that uses it updates with it.
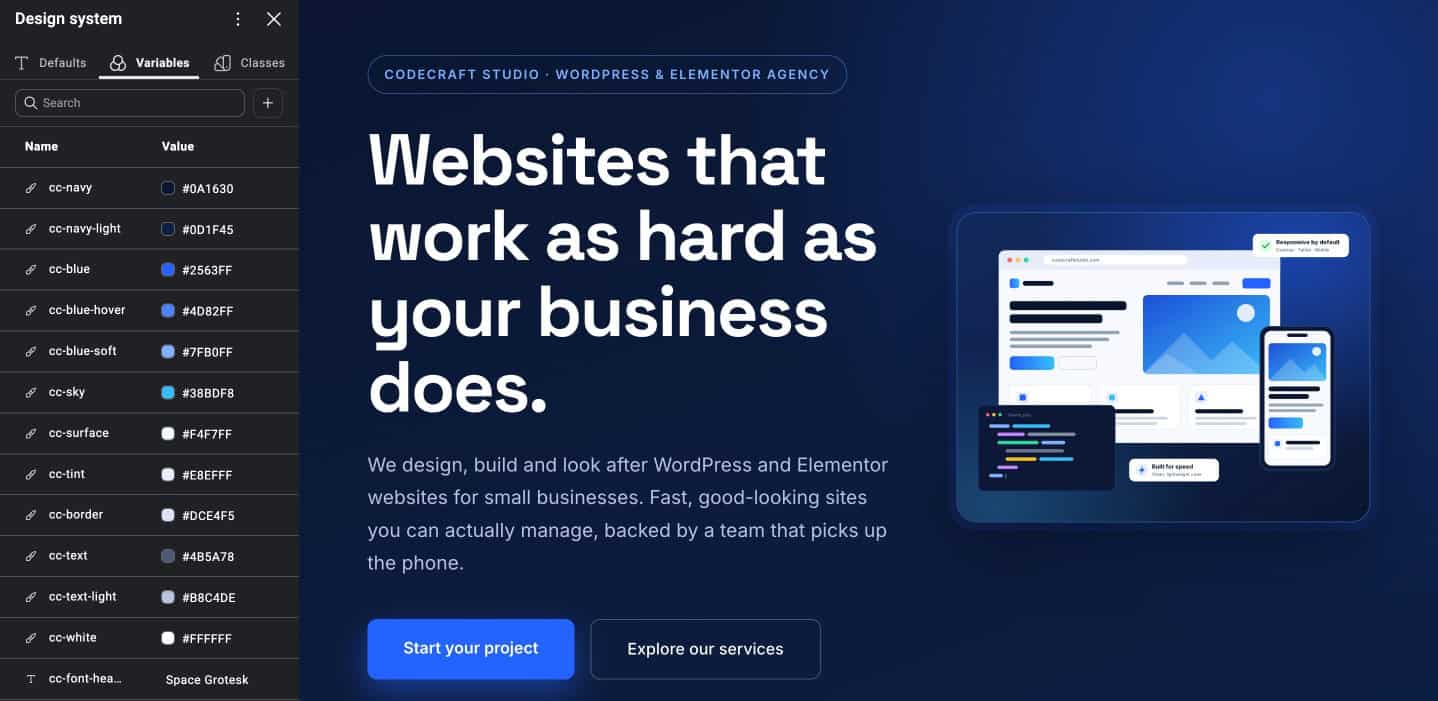
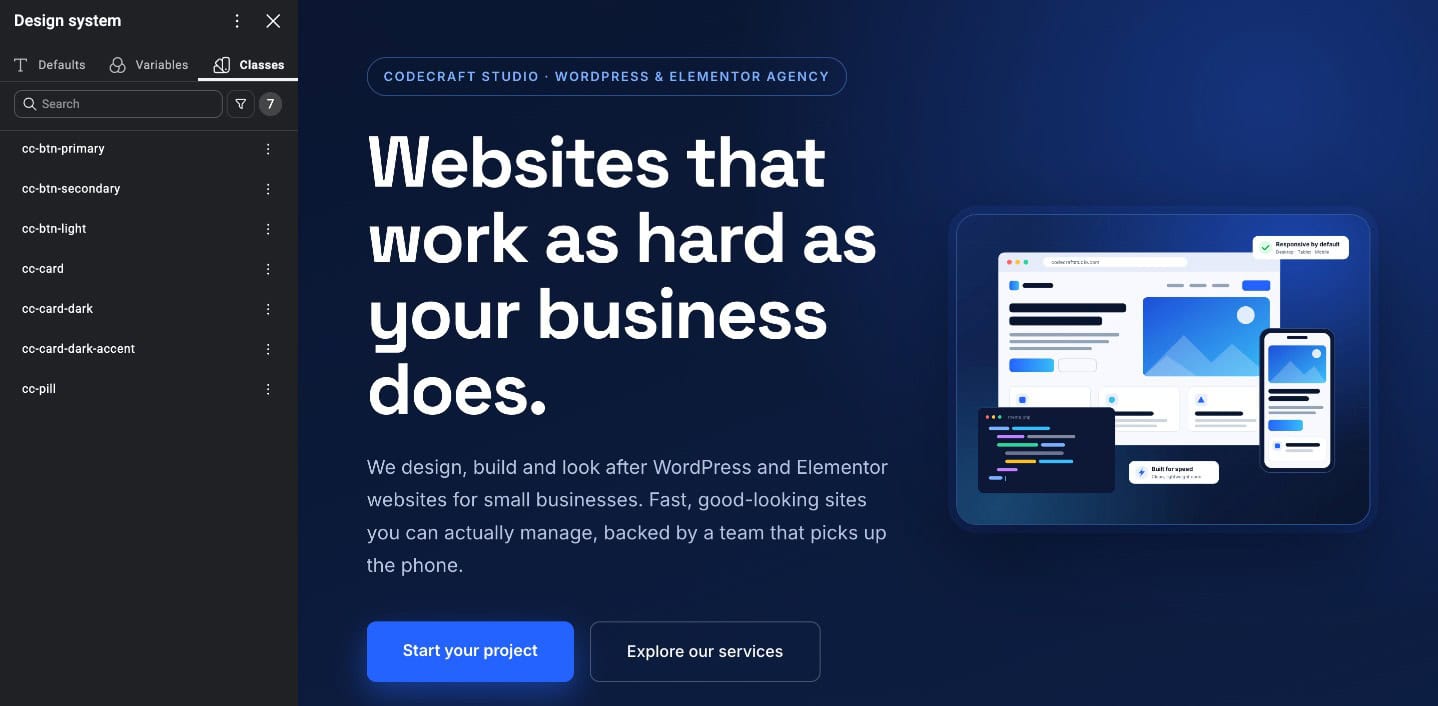
Notes: If a page is open in the Elementor editor while Claude changes it, Elementor shows a Page Updated by AI message. Click Reload to see the latest version. To avoid it, keep the page closed while Claude works.
Refine the Page in Chat
With the brand saved, changes no longer mean hunting through the editor. You describe them in the same chat, and the global variables do the heavy lifting.
PROMPT
Add a short FAQ section to the Home page above the “Start your project” call to action, and change our button colour to a brighter blue in the global variable.
Claude adds the new section and updates the colour in the global variable. Because every button uses that variable, they all change together, without editing a single button by hand.
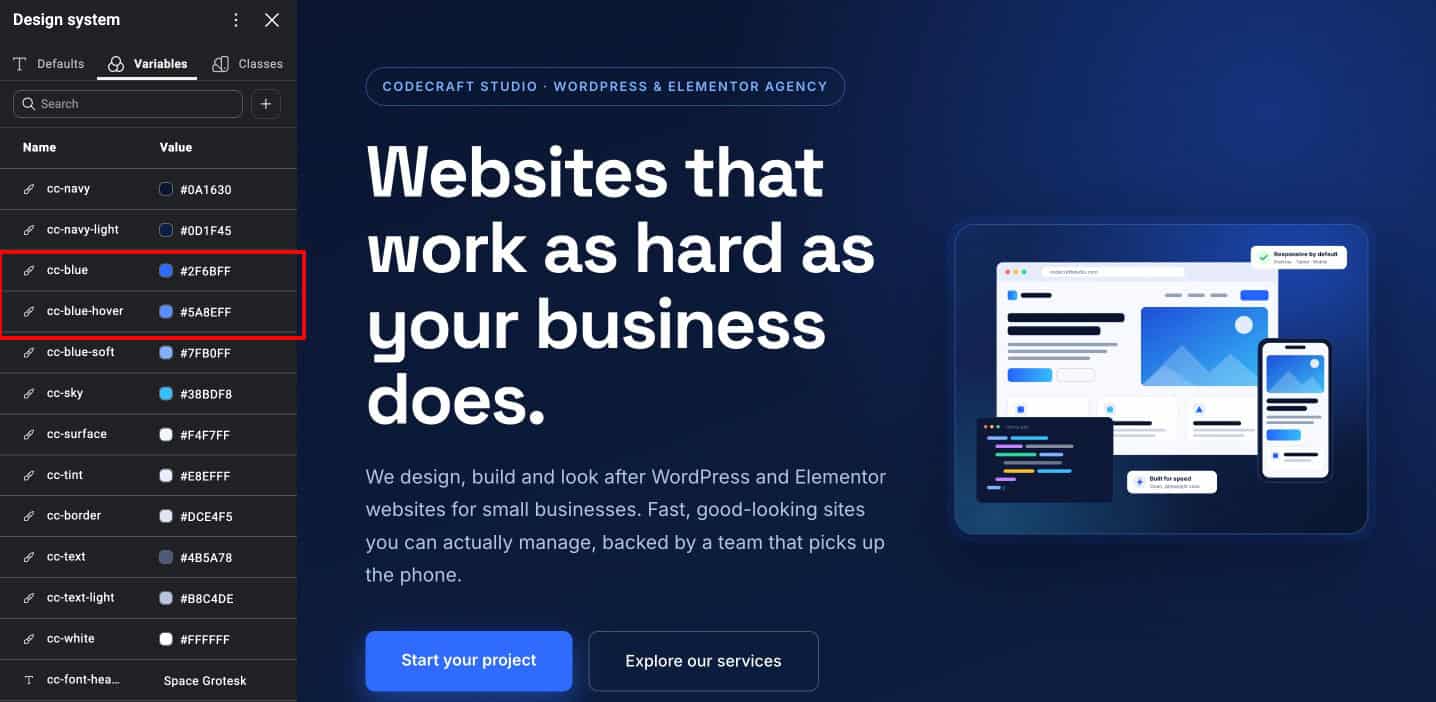
Build the Services Page with the Same Brand
This is where saving the brand pays off. The Services page prompt only needs to describe the content, because the look is already defined.
PROMPT
Build a Services page for Codecraft Studio using our global variables and classes. Include a hero, four detailed service cards (WordPress development, Elementor website design, WooCommerce stores, website maintenance and support), our process in four steps (Discover, Design, Build, Launch), and a “Start your project” call to action. For images, check our Media Library first. If nothing fits, create a custom illustration. Save the page as a draft.
The Services page comes out matching the Home page, with no styling repeated in the prompt. For a new hero image, follow the same four-step image workflow from earlier.
Add a Header and Footer with Theme Builder (Pro)
Matching pages still need the same header and footer around them to feel like one website. Elementor MCP can create both in the Theme Builder, one at a time. This step needs Elementor Pro.
Start with the header, since it’s the first thing visitors see on every page.
PROMPT
Create a site header for Codecraft Studio using our global variables and classes. Include a logo area on the left, a menu with Home, Services, About and Contact in the middle, and a “Start your project” button on the right. Display it on the entire site and keep it as a draft.
Then build the footer, which closes every page and gives visitors one more way to get in touch.
PROMPT
Create a site footer for Codecraft Studio using our global variables and classes. Include a short line about who we are, links to our four services, our contact details, and a copyright line at the bottom. Display it on the entire site and keep it as a draft.
Claude creates both as drafts, already set to display across the whole site. Like your pages, they stay hidden from visitors until you publish them.
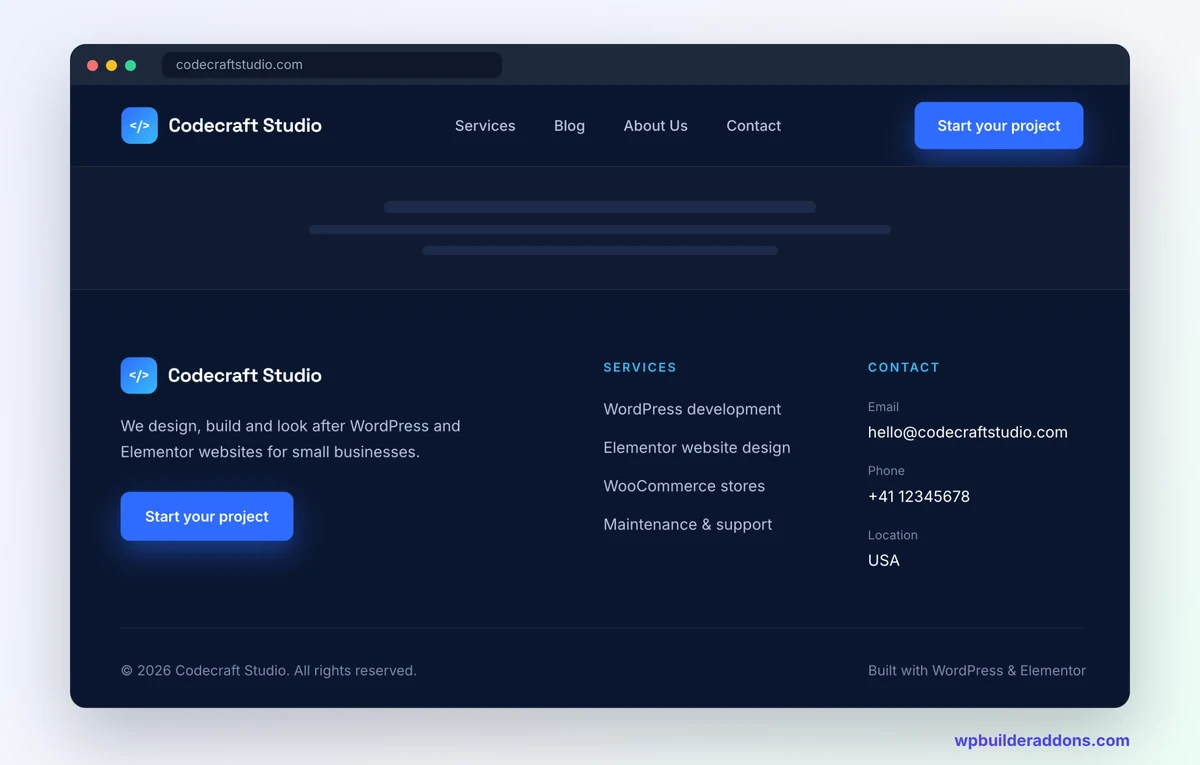
Make Every Page Responsive
A site that looks right on desktop still needs to work on phones and tablets. One prompt covers all your pages, the header and the footer.
PROMPT
Make all pages, the header and the footer responsive for tablet and mobile.
If you have the Claude in Chrome extension installed, Claude can open your pages and the Elementor editor in Chrome. It checks how they look on smaller screens and fixes the layout where needed. Without the extension, ask for the same thing and check the result yourself in Elementor’s responsive mode.
Review the Drafts and Publish
Because everything is saved as a draft, you get a natural checkpoint before anything goes live. Open each page in the Elementor editor and review it yourself. Small visual adjustments, like spacing or a line of text, are often quicker to make by hand than to describe in chat.
When everything looks right, publish in WordPress or ask Claude to do it for you.
PROMPT
Publish the Home page, services page, the header and the footer.
By the end of a build like this, Claude has created pages, styles, theme parts and layout changes across your whole site. That raises a fair question: how do you know exactly what it changed?
How Can You See What the AI Changed on Your Site?
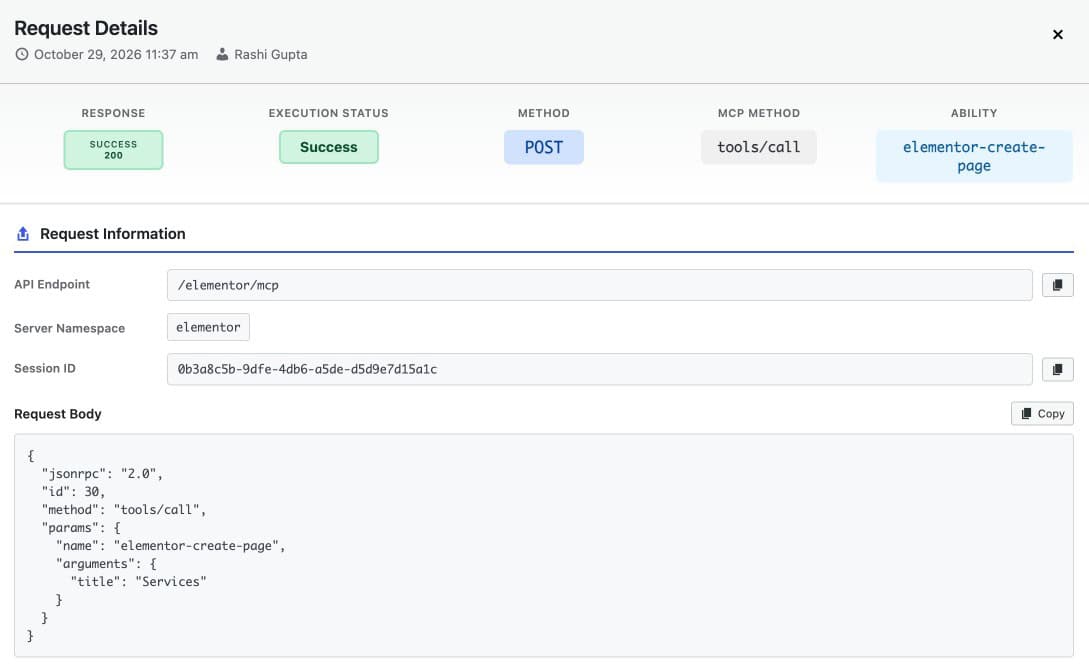
MCP Tracker by WPVibes shows you exactly what the AI changed. Every action Claude takes through Elementor MCP goes through the WordPress Abilities API, and MCP Tracker records each one with the tool used, the request, the response, the user and the time.
MCP Tracker records every MCP request made through the WordPress Abilities API, so the log builds up as Claude works. You can filter the log by date, ability, server, and user, and open any entry to see exactly what changed.
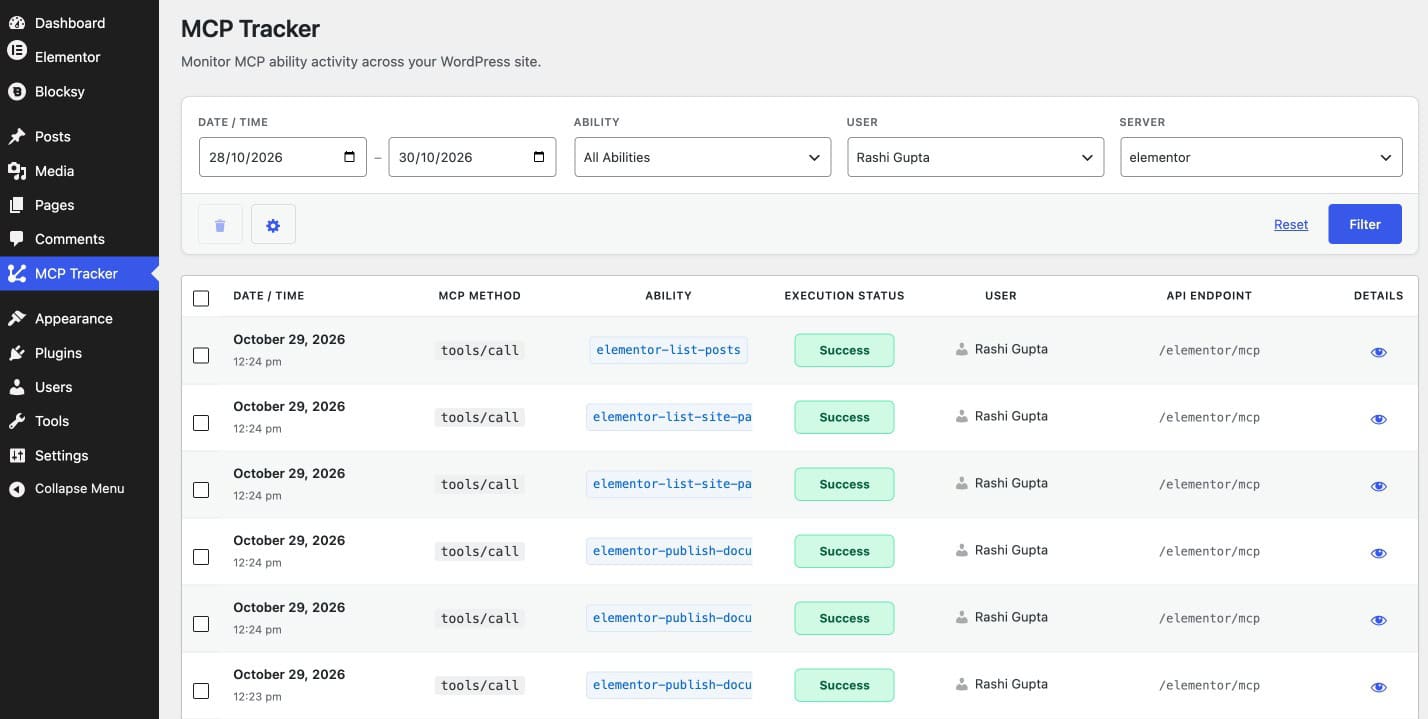
For a build like Codecraft Studio’s, that means one clear list of every page Claude built, every style it changed and every item it published.
MCP Tracker only records. It never blocks or changes a request, and the logs stay in your own WordPress database. Only administrators can open the MCP Tracker screen.
What Can’t Elementor MCP Do Yet?
Elementor’s MCP connection is built for Elementor work, so general WordPress tasks and most classic Elementor widgets are outside what it can do. As the image workflow showed, it can’t upload files, so new images always go through your Media Library first.
The other limits follow the same idea. Anything that isn’t Elementor design work needs another route:
| Elementor MCP can’t do yet | What to do instead |
|---|---|
| Edit classic (V3) widgets, apart from a few theme widgets like post title and nav menu | Edit them in the Elementor editor |
| Upload new images or files | Upload to the Media Library, then ask AI tool to place them |
| Install or manage plugins and themes | Enable wp-admin mode, or connect a WordPress MCP plugin |
| Manage users or WordPress settings | Enable wp-admin mode, or connect a WordPress MCP plugin |
| Write or edit regular block editor posts | Use the block editor, or connect a WordPress MCP plugin |
| Manage categories, tags and menus | Use wp-admin, or connect a WordPress MCP plugin |
For tasks outside Elementor, you can connect a second MCP server to the same site. Our guide to WordPress MCP server plugins covers the options.
Do you need Angie for Elementor MCP?
No, not for building pages. Everything in the build above, from pages and brand styles to the header and footer, works with Elementor alone, plus Elementor Pro for the Theme Builder parts.
Angie, Elementor’s AI plugin, is an optional add-on. It unlocks extra abilities through Elementor MCP, such as custom widgets, WP Admin customisation, bulk content updates, and abilities from other plugins like WooCommerce, Yoast and ACF. Some Angie features use Elementor credits.
Important: Be careful with Super Admin mode. Angie’s Super Admin mode gives AI full access to your site’s files, database and PHP. Elementor recommends using it only on staging sites, after a backup, and switching it off when you finish.
Conclusion
So, can you really describe a page to Claude and get a real Elementor page back? With Elementor MCP, yes. You connect once, describe what you need in plain words, and review native Elementor drafts that you can refine in chat or in the editor. Save your brand early, and every page after the first one gets faster.
Frequently Asked Questions about Elementor MCP
Is Elementor MCP free?
Yes, connecting is free, and basic pages and sections can be built without Elementor Pro. Pro features like headers, footers, popups and forms need a Pro plan. Your AI tool, such as Claude, has its own pricing, which is separate from Elementor.
Does Elementor MCP publish pages automatically?
No. Everything your AI tool builds through Elementor MCP is saved as a draft. Nothing goes live until you publish it yourself in WordPress or ask your AI tool to publish it. This gives you time to review every page in the Elementor editor first.
Can Elementor MCP edit pages built with older Elementor widgets?
Mostly no. Elementor MCP edits pages built with Atomic (V4) elements. Apart from a few theme widgets, classic V3 widgets still need to be edited in the Elementor editor.
Do I need Elementor Pro to use Elementor MCP?
You can connect and build pages and sections with the free version of Elementor. Elementor Pro is needed for Pro features such as Theme Builder headers and footers, popups, forms, loops and components.
Why is my Elementor MCP server not connecting in Claude Desktop?
The most common causes are a config entry placed outside the mcpServers block, a missing --allow-http line for local http:// sites, or Claude not being fully restarted. Fix the entry, quit Claude completely and reopen it, then check Settings > Developer.