
How to Design a WooCommerce Product Category Page in Elementor
Your WooCommerce category pages are doing a lot of work. They’re often the first page a customer lands on from a Google search, and the default theme layout gives you almost nothing to work with. No control over the product grid, no custom layouts per category, no brand consistency.
Dynific Addons for Elementor fixes this. Using DA Templates, you can design a fully custom WooCommerce product category page directly in Elementor, choosing exactly how products display, what information shows, and how the layout behaves. No code required.
This guide walks you through the complete setup, from creating your product block layout to assigning it to a category live on your site.
What Do You Need Before You Start?
Dynific Addons for Elementor requires Elementor (free version is fine) and a WooCommerce store with at least one product category and a few products. Make sure Dynific Addons for Elementor Pro is installed and activated, the DA Templates feature used in this guide is part of the Pro version.
How Does Designing a WooCommerce Category Page with Dynific Addons Work?
Dynific Addons uses a two-template system to build WooCommerce category page. You create two separate DA Templates: a Block Layout that defines how a single product looks, and a Category Archive Layout that controls the overall page structure and uses the block layout to render the product grid. These two templates work together so you design each piece independently and connect them.
This is the same pattern Dynific Addons uses across all archive and category layouts, once you’ve done it once, it applies to every archive type on your site.
Step 1: Create the Product Block Layout
The Block Layout is a template that defines how one individual product looks inside the grid – its image, title, price, rating, and add-to-cart button. You design it once, and Dynific Addons repeats it for every product in the category.
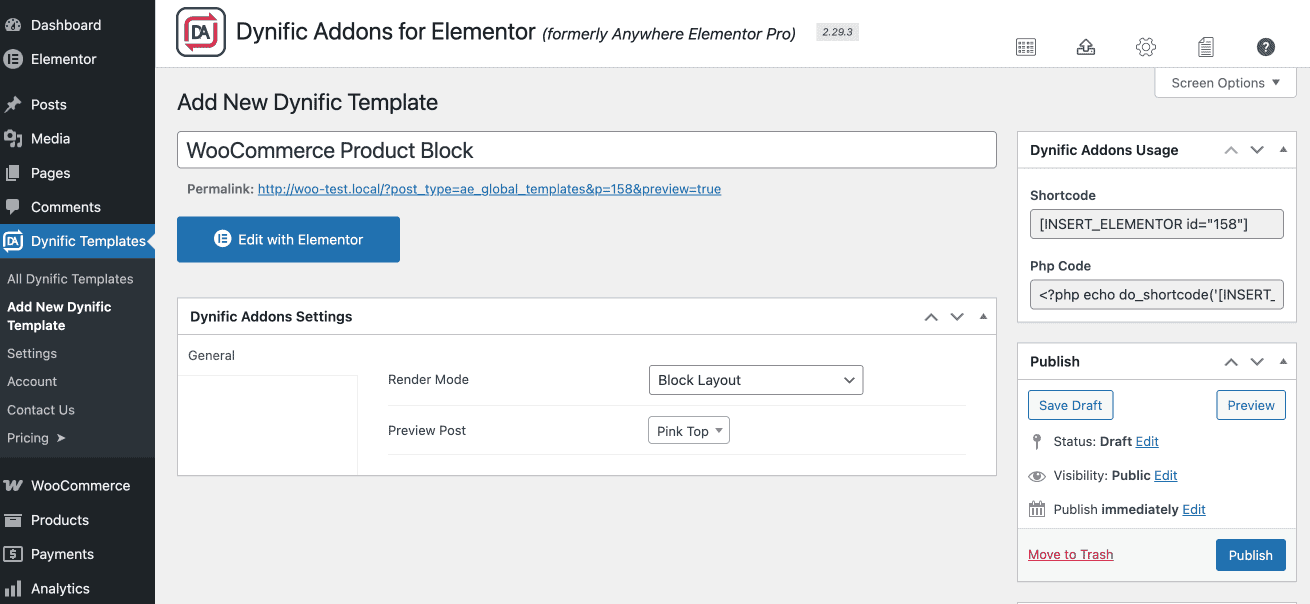
Go to Dynific Addon Templates → Add New.
Give the template a clear name (for example: WooCommerce Product Block) and configure the following settings:
- Render Mode: Choose the block layout
- Preview Post: Start typing a product name and select it. This product will display as your preview while designing in Elementor.
Publish the template, then click Edit with Elementor.
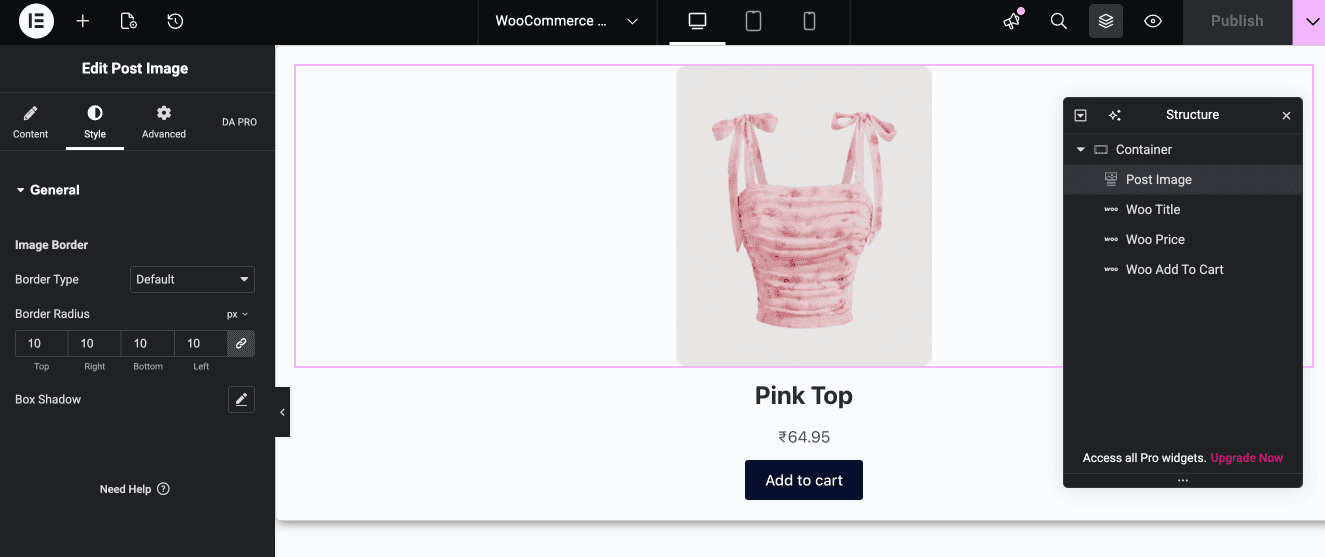
Inside Elementor, look for the widget group labelled DA Template Elements. This is where the Dynific Addons WooCommerce-specific widgets live. The most useful ones for a product block are:
- DA – Woo Title: displays the product name
- DA – Post Image: display the product image
- DA – Woo Price: shows regular and sale price automatically
- DA – Woo Rating: shows the star rating
- DA – Add to Cart: renders the add-to-cart button
Build the layout the way you want it. A common starting point is a single column with the product image at the top, title and price in the middle, and the add-to-cart button at the bottom.
When the block layout looks right, save the template.
Keep the block layout simple. The goal is a clean, repeatable block, not a full page design. You’ll handle spacing, columns, and overall page structure in Step 2.
Step 2: Create the Category Archive Layout
The Category Archive Layout is the full page template for your WooCommerce category page. It controls the page structure, the header area, category title, product grid, and any additional elements like filters or descriptions.
Go to Dynific Addon Templates → Add New.
Name this template (for example: WooCommerce Category Archive) and configure:
- Render Mode: Taxonomy Archive Template
- Taxonomy: Product Categories
- Preview Term: Start typing a product category name and select it. This category will be used to show live preview data in Elementor.
- Auto Apply: Check this box if you want this layout to apply to all product categories automatically. You can override it per category later.
- Template: Choose Elementor Full Width for the cleanest editing experience.
Save the template, then click Edit with Elementor.

Step 3: Add the Product Grid with the DA – Post Blocks Adv Widget
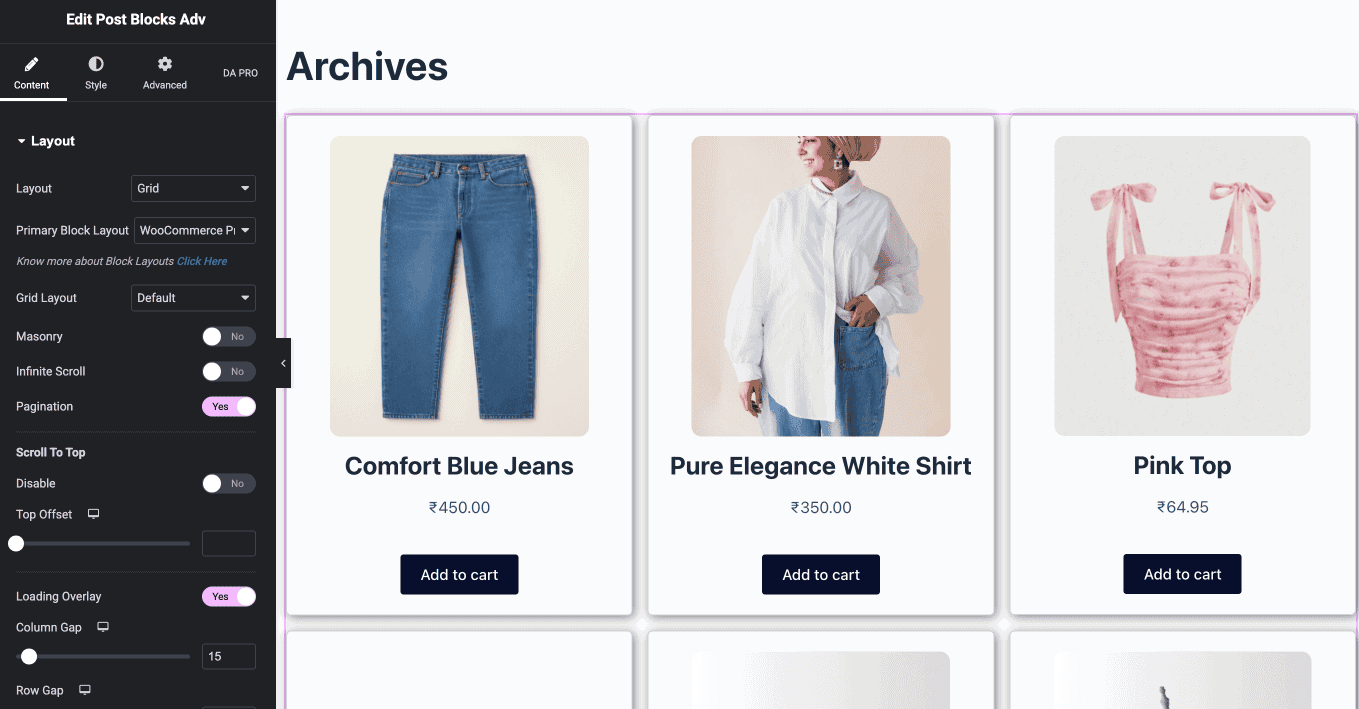
The DA – Post Blocks Adv widget is what renders the product grid on the category page. It reads the products in the current category and uses the Block Layout from Step 1 to display each one.
Find DA – Post Blocks Adv in the Elementor widget panel and drag it onto the page.
In the widget settings, configure:
- Primary Block Layout: Select the Block Layout template you created in Step 1
- Columns: Choose the number of columns for the product grid (typically 3 or 4)
- Query: Choose source as Current Archive
- Ordering: Set to Menu Order or Date, depending on your preference.
At this point, you should see the product grid rendering in the Elementor preview using your block layout repeated across real products from the selected category.
Add any other elements to the page, a category title (use the DA – Title widget), and choose as Archive title. Style everything to match your theme.
Save the template.
Step 4: Assign the Layout to Your Product Category
Dynific Addons gives you two ways to assign the category archive layout: automatically to all categories via the Auto Apply setting you already configured, or manually per category for more control.
To assign to a specific category manually:
- Go to Products → Categories in your WordPress admin
- Click on the category you want to customise
- Scroll to the Dynific Addon – Term Template dropdown at the bottom of the category edit page
- Select the Category Archive Layout you created in Step 2
- Click Update

Step 5: Preview Your WooCommerce Category Page
Navigate to any product category on the frontend of your site. You should see the new layout in place, your custom product grid using the block layout you designed, styled exactly the way you built it in Elementor.
If the layout isn’t showing, double-check that the template’s Auto Apply is checked or the manual assignment is saved on the category. Also confirm the Template type is set to Elementor Full Width (not Theme Default) in the DA Template settings.

Want Full Control Over Every WooCommerce Category Page on Your Site?
That’s exactly what Dynific Addons for Elementor is built for. The WooCommerce category page layout you just built is one piece of a much larger system, the same DA Templates approach works for your shop page, individual product pages, post archive pages, custom post type archives, and taxonomy pages across your entire site.
Everything is designed in Elementor. No page builder switching, no theme template files, no code.
Dynific Addons for Elementor includes:
- Custom WooCommerce product category page layouts (this guide)
- Custom WooCommerce single product page layouts
- Custom shop page layouts
- Post and archive page templates for any post type
- ACF field display widgets for dynamic content
- DA – Post Blocks Adv widget for filterable, sortable product and post grids
If you’re already using Elementor to build your site, Dynific Addons slots in as the dynamic layer that makes every archive, category, and custom template completely your own.
Get Dynific Addons for Elementor →
Conclusion
Custom WooCommerce product category pages used to require a developer or a premium theme with built-in category templates. With Dynific Addons for Elementor, you build them directly in Elementor, the same editor you’re already using for every other page on your site.
The two-template system (Block Layout + Category Archive Layout) gives you full control: how individual products look, how the grid is structured, and which categories use which layout.
If you haven’t got Dynific Addons for Elementor yet, you can get it, and start designing your category pages today.