ACF Options Page: How to Create and Use It
An ACF options page is a custom settings screen in the WordPress admin where you store site-wide content, such as your phone number, business hours, logo or an announcement banner. You fill it in once and use those values anywhere on your site. It needs ACF PRO, and since ACF 6.2 you can create one from ACF > Options Pages without writing code.
This guide covers creating an options page from the admin or with PHP, adding fields to it, and displaying the values on your site, including in Elementor. If you are new to ACF, start with our ACF guide for beginners.
Key takeaways
- An ACF options page stores site-wide content, like contact details or a banner, in one place in the WordPress admin.
- It needs ACF PRO. Since ACF 6.2 you can create one from ACF > Options Pages, or with PHP if you prefer code.
- Show the values in Elementor with Dynific Addons, or in theme templates with the_field().
What Is an ACF Options Page?
An ACF options page is a dedicated admin screen for global settings that do not belong to any single post or page. Instead of hardcoding details like contact information or social links into your theme, you store them on the options page and pull them in wherever you need them.
It supports the same field types as any ACF field group, including text, images, select fields, checkboxes and colour pickers, so it works for anything from a footer phone number to theme-wide design choices.
What Are the Benefits of an ACF Options Page?
- Everything in one place. Site-wide details like your phone number, email and address live on one screen, so an update takes seconds and stays consistent everywhere.
- No code for editors. Admins and content managers can change global content from a simple form, without opening theme files.
- Cleaner theme files. Settings stay separate from your templates, which makes the site easier to maintain and troubleshoot.
- A friendly interface. Text boxes, dropdowns, image uploads and colour pickers make customisation easy for clients.
Dynific Addons for Elementor
Want these fields on your Elementor pages?
Dynific Addons for Elementor displays your options page fields anywhere on your site, from headers to footers, without code.
What Are the Best Use Cases for the ACF Options Page?
Use an options page for any content that appears in several places and changes from time to time. Common examples:
- Header and footer details such as phone number, email and address
- Social media links shown across the site
- Business or opening hours
- A site-wide announcement or promotional banner
- A logo or default images used in several templates
- Theme options for a client, such as brand colours and typography
For example, if a client wants to change the text and link of a promotional banner every week, an options page gives them one form to update. The banner changes on every page at once, without anyone editing templates.
How to Create an ACF Options Page
You can create an options page from the ACF admin screen or with PHP. The admin screen is the easiest way and needs no code.
Important: Options pages are an ACF PRO feature. The free version of ACF does not include them.
Create an options page from the ACF admin
- Go to ACF > Options Pages and click Add New
- Enter a Page Title, for example Site Settings. The Menu Slug fills in automatically
- Leave Parent Page set to No Parent to give the page its own menu item, or choose a parent to place it under an existing menu
- Click Save Changes
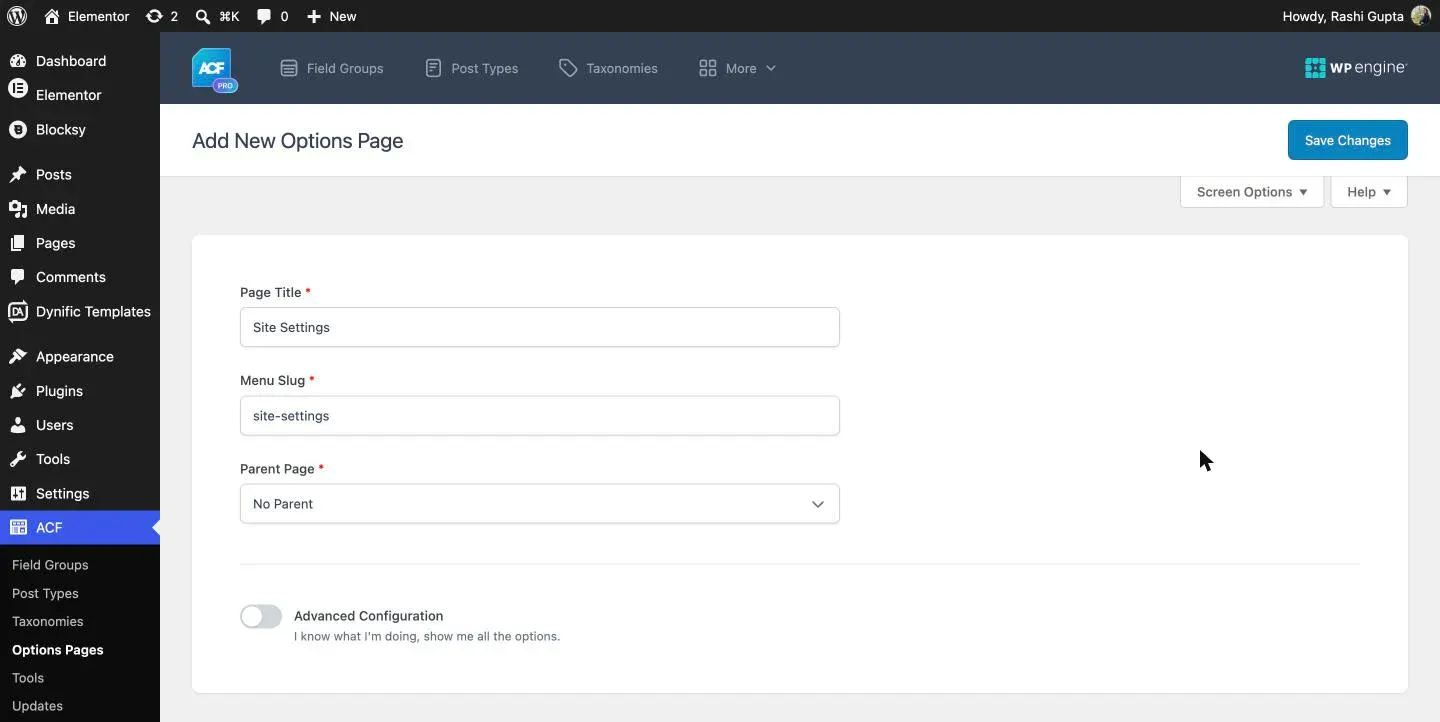
Your new options page now appears in the WordPress admin menu. Turn on Advanced Configuration if you want to see more settings for the page.
Create an options page with PHP
If you prefer code, or you are building a theme, register the page with the acf_add_options_page() function in your theme’s functions.php file. Before ACF 6.2, this was the only way to create an options page.
 if( function_exists('acf_add_options_page') ) {
 acf_add_options_page(array(
      'page_title' => 'Theme Options',
      'menu_title' => 'Theme Options',
      'menu_slug' => 'theme-options',
      'capability' => 'edit_posts',
      'redirect' => true
   ));
}
The function_exists() check makes sure ACF is active before the page is registered. The array sets the page title, menu title, menu slug, the capability a user needs to see the page, and whether it redirects to its first subpage.
Add subpages with PHP
To split settings into sections, add subpages under a parent options page:
if( function_exists('acf_add_options_page') ) {

    acf_add_options_page(array(
        'page_title'    => 'Theme General Settings',
        'menu_title'    => 'Theme Settings',
        'menu_slug'     => 'theme-general-settings',
        'capability'    => 'edit_posts',
        'redirect'      => true
    ));

    acf_add_options_sub_page(array(
        'page_title'    => 'Theme Header Settings',
        'menu_title'    => 'Header',
        'parent_slug'   => 'theme-general-settings',
    ));

    acf_add_options_sub_page(array(
        'page_title'    => 'Theme Footer Settings',
        'menu_title'    => 'Footer',
        'parent_slug'   => 'theme-general-settings',
    ));
 }
Here acf_add_options_sub_page() creates each subpage, and parent_slug tells ACF which options page it belongs to. In this example, Header and Footer appear under Theme Settings.

Tips: Add PHP snippets to a child theme or a code snippets plugin, so a theme update does not remove your code.
How Do You Add Fields to an ACF Options Page?
Create a field group as usual and set its Location Rule to Options Page is equal to your page.
- Go to ACF > Field Groups and click Add New, or use the Add fields link that appears right after you save an options page
- Add your fields, for example Phone Number, Business Hours and Announcement Text
- Under Settings > Location Rules, set Options Page is equal to Site Settings
- Click Save Changes
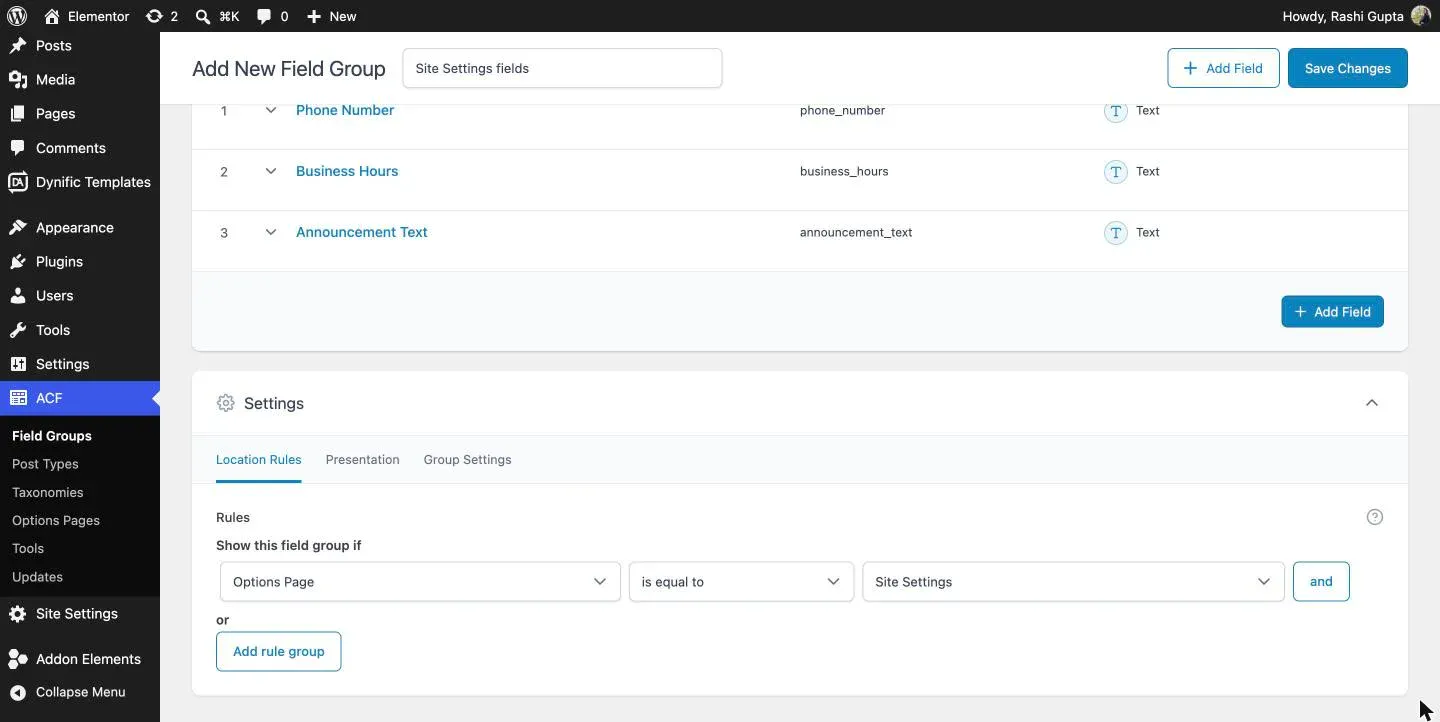
Need more detail on field groups? See how to create a field group in ACF. If you already built the same fields on another site, you can import and export ACF field groups to save time.
How Do You Fill In the Options Page?
Open the options page from the WordPress admin menu. Your fields appear there, ready to fill in. Enter the values and click Update.
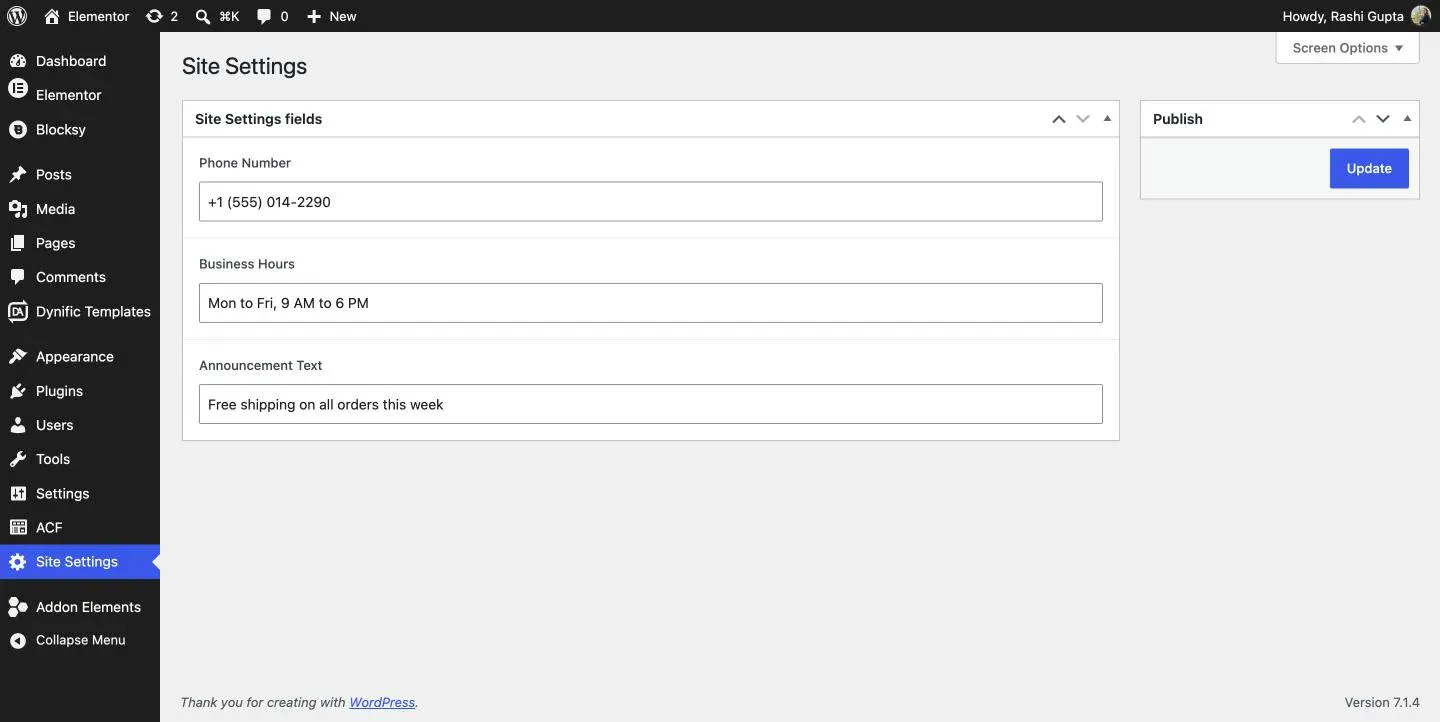
How Do You Display Options Page Fields in Elementor?
Use the DA – ACF Fields V2 widget from Dynific Addons for Elementor and set its Source to Option.
- Open your page or template in Elementor and add the DA – ACF Fields V2 widget
- Set Field Type to match your field, for example Text
- Set Source to Option
- In Field, enter the field name, for example announcement_text
- Use Before Text or After Text to add a label, such as Call us: before a phone number
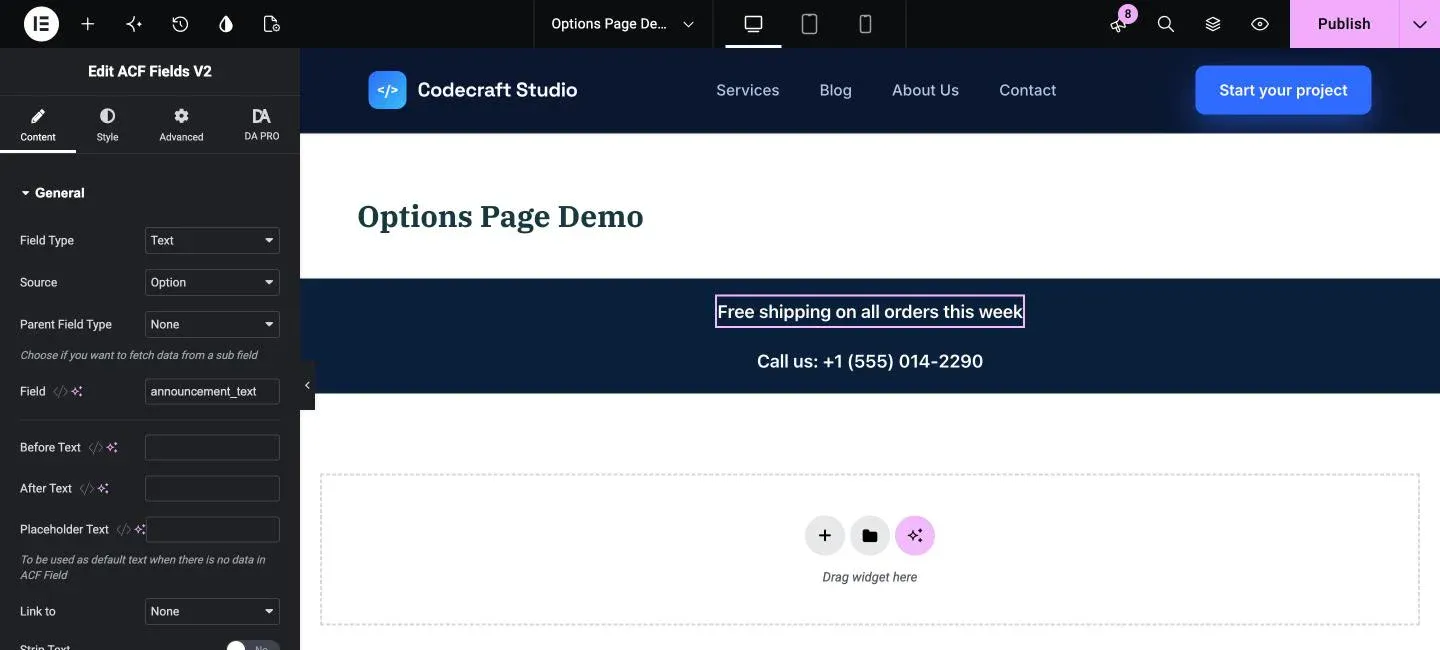
Notes: Options page fields work especially well in header and footer templates. Change a value on the options page and it updates on every page that uses it.
How Do You Display Options Page Fields With PHP?
In a theme template file, such as header.php or footer.php, use the_field() with option as the second parameter:
<?php the_field('header_title', 'option'); ?>
The first parameter is the field name, which must match the name in your field group. The second parameter, option, tells ACF to read the value from the options page instead of the current post.

Dynific Addons for Elementor
Show options page fields in Elementor
Display phone numbers, business hours and banners from your ACF options page anywhere in Elementor, without code.
Frequently Asked Questions
What is the ACF Options Page used for?
The ACF Options Page is used to store and manage global settings in one centralized location within the WordPress admin, such as site logos, contact details, or global banners.
Who benefits most from using the ACF Options Page?
Both. Developers get a clean place to store global settings, and clients or content managers can update those settings without touching code.
What kind of fields can I add to an ACF options page?
You can add any standard ACF field types like text, image, checkbox, radio button, color picker, etc.
How do I connect custom fields to a specific options page?
When creating a field group, set the Location Rules to “Options Page” and choose the specific page on which you want those fields to appear.
Is the ACF Options Page feature available in the free version of ACF?
No. The Options Page feature is only available in ACF Pro.
Can I use ACF Options Page without writing any code?
Yes. Since ACF 6.2 you can create and manage options pages entirely from ACF > Options Pages, so no code is needed.
What is acf_add_options_page?
It is the PHP function that registers an options page in code, usually in functions.php. Since ACF 6.2 you can create the same page from ACF > Options Pages instead.
How do I show ACF options page fields in Elementor?
Use the DA – ACF Fields V2 widget from Dynific Addons for Elementor, set Source to Option and enter the field name.