
How to Make a Container, Section or Column Clickable in Elementor
To make a container clickable in Elementor, select the container, open the Layout tab, expand Additional Options and set HTML Tag to a (link). A Link field appears where you paste the URL. That built-in option suits a simple card, while classic sections, columns and cards that need a different link per post need a plugin.
Clickable boxes show up on almost every modern site: service cards, blog cards, promo banners and team profiles. Visitors expect to click anywhere on the card instead of hunting for a small button. This guide covers three ways to add a link to a whole container, section or column in Elementor, how to pick the right one, and how to fix a clickable container that is not working.
Key Takeaways
- Containers with one link: use Elementor’s built-in HTML Tag set to a (link), and keep buttons and other links out of that container.
- Sections and columns: use AE – Wrapper Link from the free Addon Elements for Elementor plugin.
- Cards in loops or ACF layouts: use DA – Dynamic Link in Dynific Addons for Elementor, so each container links to its own post or custom field URL.
Which Method Should You Use to Take an Elementor Element Clickable?
The right method depends on what the layout is built with and where the link comes from. Flexbox Containers with one fixed link can use Elementor’s built-in option. Classic sections and columns need AE – Wrapper Link from Addon Elements for Elementor. Containers that should open a different page in every card need DA – Dynamic Link from Dynific Addons for Elementor.
| Method | Works on | Plugin needed | Best for | Watch out for |
|---|---|---|---|---|
| HTML Tag: a (link) | Flexbox Containers | None, part of free Elementor | A single card or banner with one link | No buttons or links inside the container |
| AE – Wrapper Link | Sections and columns | Addon Elements for Elementor (free) | Pages built with classic sections | Not available on Flexbox Containers |
| DA – Dynamic Link | Flexbox Containers | Dynific Addons for Elementor (premium) | Post loops, ACF layouts, reusable templates | Needs the premium plugin |
Not sure which layout a page uses? Open the Navigator in Elementor. Older pages list each block as a Section and Column, while newer pages list Containers. Our guide to Flexbox Containers and Grid in Elementor explains the difference in more detail.
How do you Make a Container Clickable with Elementor’s built-in option?
Elementor lets any Flexbox Container work as a link by changing its HTML tag to a (link). The whole container, including its background, heading, text and images, becomes one clickable area. This option is part of free Elementor, so no extra plugin is needed for a simple clickable card.
- Open the page in Elementor and click the container’s handle to select it.
- In the Layout tab, expand Additional Options.
- Set HTML Tag to a (link). A Link field appears below it.
- Paste the destination URL. With Elementor Pro, you can click the dynamic tags icon to pull the link from the current post instead.
- Click the gear icon next to the Link field if the link should open in a new tab or carry a nofollow attribute.
- Click Update and test the container on the live page.
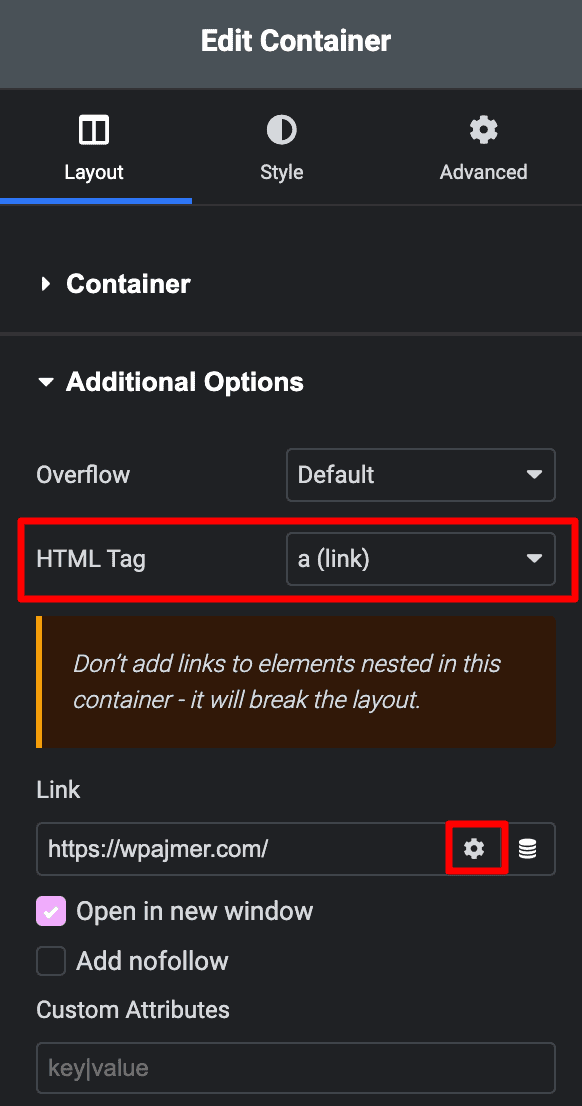
Important: Do not place a Button widget, a linked heading or any other link inside a container set to a (link). A link inside a link is invalid HTML, so browsers can break the layout or ignore one of the links. If the card needs a separate button, keep the button outside the clickable container or link the widgets one by one.
Elementor documents this option in its own help center, in the article on how to make a Flexbox container clickable.
Free in Addon Elements for Elementor
Make any Section or Column Clickable
AE – Wrapper Link adds a link setting to classic sections and columns, so the whole box opens your page. No code, and it sits alongside the widgets you already use.
How do you Make a Section or Column Clickable with Wrapper Link?
Classic Elementor sections and columns have no link setting of their own. The free Addon Elements for Elementor plugin adds one, called AE – Wrapper Link, which makes the whole section or column open a URL when a visitor clicks anywhere inside it. AE – Wrapper Link works on sections and columns only, not on Flexbox Containers.
- Install and activate Addon Elements for Elementor from Plugins > Add New Plugin.
- Edit the page with Elementor and select the section or column you want to link.
- Open the Style tab and expand AE – Wrapper Link.
- Turn on Enable Link and add the destination in the Link field.
- Click Update and test the section or column on the live page.
The Link field accepts a typed URL or a dynamic tag, which helps when the section sits inside a template. Turn on Enable Open In New Window when the destination is another website and you want visitors to keep your page open in the background.
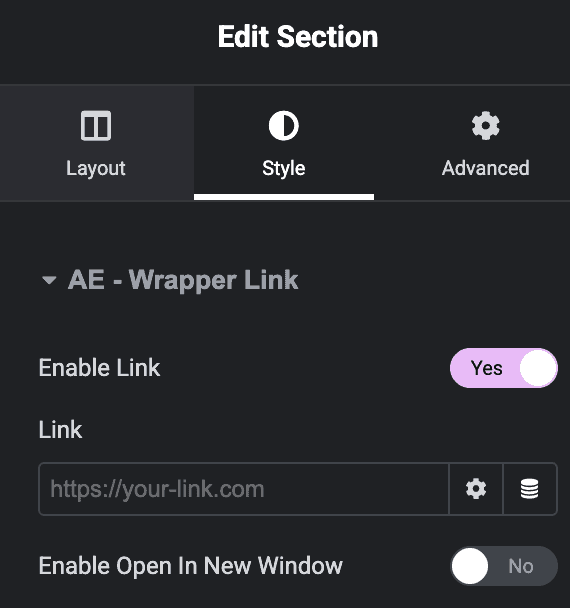

Like the built-in container link, AE – Wrapper Link works best with one destination per section. A separate button or text link inside the same section can trigger the wrapper link as well. The Wrapper Link documentation lists every setting.
How do you Make a Container Clickable
with Dynific Dynamic Link?
Dynific Addons for Elementor, a premium plugin, adds a DA – Dynamic Link setting to Elementor Flexbox Containers. Turn it on and the whole container opens a link, which you can set as a fixed URL, the current post’s permalink or a URL saved in a custom field. It is the method to use when a container link has to change from card to card.
- Edit the page or template with Elementor and select the container.
- Open the DAPro tab in the container settings.
- Expand Dynamic Link Settings and enable it.
- Choose the link type: Static URL, Post Link or Custom Field URL.
- Set the destination, click Update and test the container on the live page.
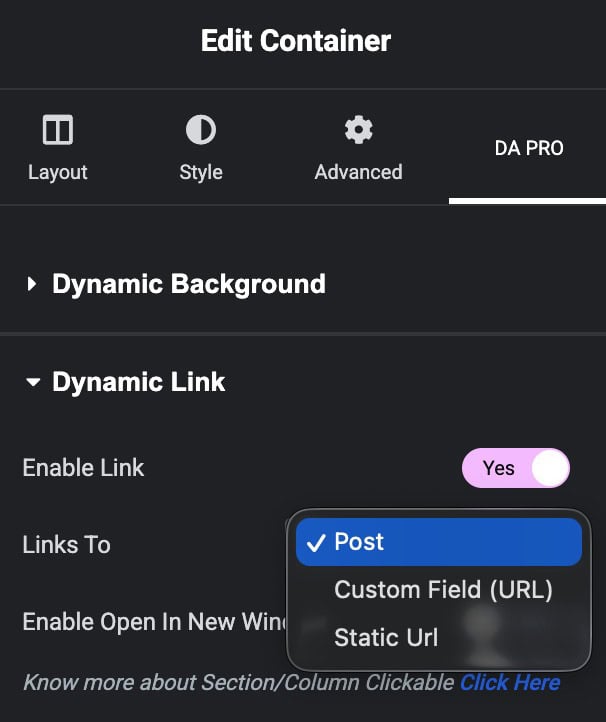
Once Dynamic Link is turned on, the link type decides where the container goes. Dynific Addons for Elementor offers three link types.
Link a Container to One Fixed URL
Choose Static URL when the container should always open the same page, such as a promo banner, a call-to-action box or a service card on your homepage. Enter the address once, and a click anywhere inside the container takes visitors there, just like a button would.
Link Each Container to Its Own Post
Choose Post Link when the container is part of a post layout. Each container then opens the permalink of the post it displays, so a blog grid, portfolio or archive built from one template sends every card to the right article without setting links one by one.
Post Link fits Single Post templates and block layouts for the Dynific Post Blocks widget, where the same container design repeats for every post in the query.
Link Each Container to a Different URL from a Custom Field
Choose Custom Field URL when the destination is stored with each post, for example in an ACF URL field. Dynific Addons for Elementor reads that field for every item, so each container in a loop opens its own address, even when that address is on another website.
This works well for service directories, partner or affiliate listings, event cards that link to a ticket page, and portfolio items that link to a client’s live site.
Our step-by-step guide on how to make a container clickable with Dynific Addons for Elementor covers each link type with screenshots.
Dynific Addons for Elementor
One Card Design, a Different Link for Every Post
Build blog grids, directories and product layouts where each container opens its own post or ACF URL. Set it once in the template and Dynific handles the rest, with no code.
Why is your Clickable Container Not Working?
Most clickable container problems come from three causes: a link placed inside the clickable area, the setting applied to the wrong element, or testing inside the Elementor editor instead of on the live page. The table below lists the usual symptoms, what causes each one and how to fix it.
| Problem | Likely cause | Fix |
|---|---|---|
| The layout breaks or a button stops working after setting a (link) | A button or link sits inside the linked container | Remove the inner link, move the button outside the container, or link the widgets one by one |
| There is no AE – Wrapper Link option on the element | AE – Wrapper Link supports sections and columns, not Flexbox Containers | Use Elementor’s built-in a (link) option or DA – Dynamic Link |
| The whole page became clickable | The link was set on the outer page container | Open the Navigator and select the inner container that holds the card |
| Clicking a button inside opens the wrapper link instead | Nested links also trigger the wrapper link | Give the card one destination, or keep the button outside the linked area |
| Clicking the card does nothing in the editor | Clicks inside the Elementor editor select elements | Use Preview or test on the live page |
| Visitors do not notice the card is clickable | There is no visual cue on hover | Add a hover effect, such as a background color change or a slight lift |
Do Clickable Containers Affect SEO and Accessibility?
A clickable container is fine for SEO and accessibility when the link is clear and there is only one per card. Elementor’s built-in a (link) option turns the container into a real link in the page’s HTML, which search engines can follow. Whichever method you use, the card’s own text should make the destination obvious.
- Put a descriptive heading in every card. Screen readers announce the text inside a linked container as the link, so “Website design services” works far better than “Learn more”.
- Keep important pages linked elsewhere too. Link key pages from your menu or body text as well, so they never depend on a single card.
- Show a hover and focus style. A visible change tells mouse and keyboard users that the whole card is clickable.
- Check spacing on mobile. Large tap areas are easier to use, but cards stacked tightly together can cause accidental taps.
What Should You Do Next?
Pick the method that matches your layout: the built-in a (link) option for a simple container, AE – Wrapper Link for classic sections and columns, and DA – Dynamic Link when every card needs its own destination. Add a hover effect, test each card on the live page, and keep buttons out of linked areas.
If your site still runs on sections and columns, Addon Elements for Elementor gives you Wrapper Link along with its other free widgets and extensions. If you are building grids of posts, products or listings, Dynific Addons for Elementor lets each container link itself, straight from your template.
Frequently Asked Questions
How do I add a link to a container in Elementor?
Select the container, open the Layout tab and expand Additional Options. Set HTML Tag to a (link), then paste the URL into the Link field that appears. The whole container becomes clickable. Keep buttons and other links out of that container, because a link inside a link is invalid HTML.
Can I make a column or section clickable without a plugin?
No, classic Elementor sections and columns have no built-in link setting, and the a (link) option exists only for Flexbox Containers. To make a section or column clickable, install the free Addon Elements for Elementor plugin and turn on AE – Wrapper Link in the Style tab.
Why is my clickable container not working?
Check three things. First, make sure no button or link sits inside the container. Second, confirm in the Navigator that the link is set on the right container. Third, test on the live page or in Preview, because clicks inside the Elementor editor select elements instead of following links.
Can I put a button inside a clickable container?
It is best not to. With Elementor’s a (link) option, a button inside creates a link inside a link, which is invalid HTML. With AE – Wrapper Link, clicking the button can also trigger the wrapper link. If a card needs two destinations, link the heading and button separately instead of the whole container.
How do I open a clickable container link in a new tab?
With Elementor’s built-in option, click the gear icon next to the Link field and turn on Open in new window. With AE – Wrapper Link, turn on Enable Open In New Window in the AE – Wrapper Link settings on the Style tab.
Can each card in a loop link to a different page?
Yes. In Dynific Addons for Elementor, set DA – Dynamic Link to Post Link so each card opens its own post, or to Custom Field URL to pull the destination from a field such as an ACF URL field. One container design then works for every card in the grid.

Can you add link to the plugin?
Hi Rubb
You can download the plugin from here https://wordpress.org/plugins/addon-elements-for-elementor-page-builder/
Thanks, this should be build in with Elementor
Hi! Is is compatible with WPML? I.E. is the link value translatable via WPML?
Yes, you can translate it through WPML