How to Create a Dynamic Testimonial Section with ACF and Elementor
Every time a client sends you a new testimonial, you open the page in Elementor, manually edit the Testimonial Carousel widget, adjust the styling, and republish. If you manage five sites, that is five pages to update manually every time someone sends a nice quote.
Advanced Custom Fields (ACF) fixes this by separating testimonial data from page design. You set up the Elementor layout once. After that, adding a new testimonial means filling in a few fields in the WordPress admin. No Elementor editing, no risk of breaking the design, no wasted time.
This tutorial walks through two approaches to building a dynamic ACF testimonial section in Elementor: one using the ACF Repeater field, the other using a Custom Post Type. You will learn when to use which approach and how to display testimonials as a grid or carousel using Dynific Addons for Elementor, with zero code.
Why Use ACF for Testimonials Instead of Static Elementor Widgets?
Advanced Custom Fields (ACF) separates testimonial data from page design. Anyone with WordPress admin access can add, edit, or reorder testimonials without opening Elementor, and the layout stays exactly as you designed it.
Elementor’s built-in Testimonial Carousel widget is static. You type names, quotes, and photos directly into the widget settings. Want to add a fifth testimonial? Open the page in Elementor, find the widget, click “Add Item,” fill in the fields, restyle if needed, and publish. This works fine for a personal site with three testimonials that never change. The workflow falls apart when clients need to update testimonials regularly, or when you manage multiple sites.
The deeper issue is that Elementor does not natively support ACF Repeater fields in its dynamic tag system. Even if you store testimonial data in ACF, Elementor Pro’s built-in dynamic tags cannot loop through Repeater rows on their own.
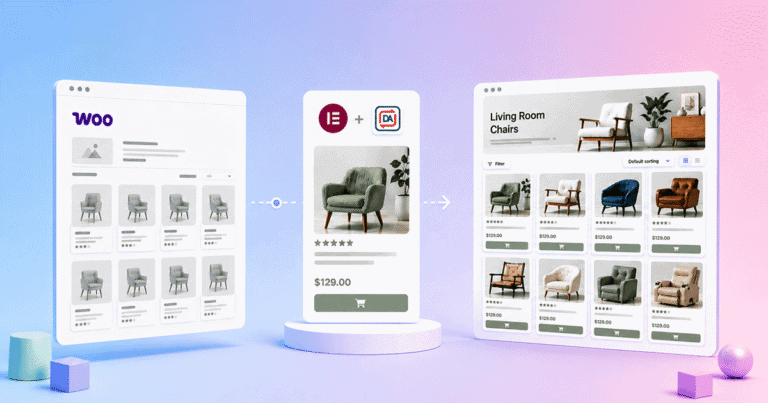
Dynific Addons for Elementor solves this. The plugin provides dedicated widgets that read ACF Repeater data and Custom Post Type content, then display them in layouts you design visually in Elementor. The result: testimonial data lives in the WordPress backend, and the Elementor layout pulls it in automatically.
For agencies, the client handoff benefit is significant. Your client updates testimonials from the familiar WordPress admin screen. They never touch Elementor. Your design stays intact.
If you are new to ACF, start with the Advanced Custom Fields Complete Guide for Beginners before continuing.
What Are the Two Approaches to Building ACF Testimonials?
There are two ways to structure testimonials with ACF: using a Repeater field on a single page, or creating a dedicated Testimonial Custom Post Type (CPT). The right choice depends on how many testimonials you have and where you need to display them.
Approach 1: ACF Repeater Field (Best for Single-Page Testimonials)
The Repeater approach stores all testimonials as rows inside a single field, attached to a specific page. Editors manage testimonials directly from that page’s edit screen by adding, editing, or reordering rows.
This works best when you have fewer than 15 testimonials, they only appear on one page (like a homepage or About page), and one person manages them. The Repeater field requires ACF Pro. The free version of ACF does not include it.
Official ACF Repeater documentation
Approach 2: Custom Post Type (Best for Growing Collections)
The CPT approach treats each testimonial as its own WordPress post, stored under a dedicated “Testimonials” menu in the admin sidebar. Editors create new testimonials the same way they create blog posts: click Add New, fill in the fields, and publish.
This works best when you have 15 or more testimonials, they need to appear on multiple pages, you want to organise them by category, or multiple team members manage them.
Since ACF 6.1, you can create Custom Post Types directly inside the ACF plugin. No need for a separate plugin like CPT UI or custom code in functions.php.
Download it from WordPress.org
Quick Comparison Table
| Factor | ACF Repeater | Custom Post Type |
|---|---|---|
| Best for | Under 15 testimonials, single page | 15+ testimonials, multiple pages |
| Management | Edit from the page itself | Dedicated Testimonials admin menu |
| Requires | ACF Pro | ACF free (for CPT) + ACF Pro (for Repeater subfields) |
| Display widget | DA – ACF Repeater | Post Blocks Adv |
| Individual URLs | No | Optional (archive + single pages) |
| Client handoff | Simpler (one page to edit) | Clearer (dedicated menu, familiar workflow) |
| Categories/filtering | No | Yes (custom taxonomy) |
Pick the approach that fits your situation, then follow the matching setup steps below.
How Do You Set Up ACF Fields for Testimonials?
Both approaches start in the ACF settings. You define the fields once, and they determine what information editors fill in for each testimonial.
How Do You Create a Testimonial Repeater Field Group?
Follow these steps to create a Repeater field that stores testimonials directly on a page:
- Go to ACF > Field Groups > Add New.
- Name the field group “Page Testimonials.”
- Click Add Field. Set the Field Label to “Testimonials” and the Field Type to Repeater.
- Set the Button Label to “Add Testimonial” so editors see a clear action.
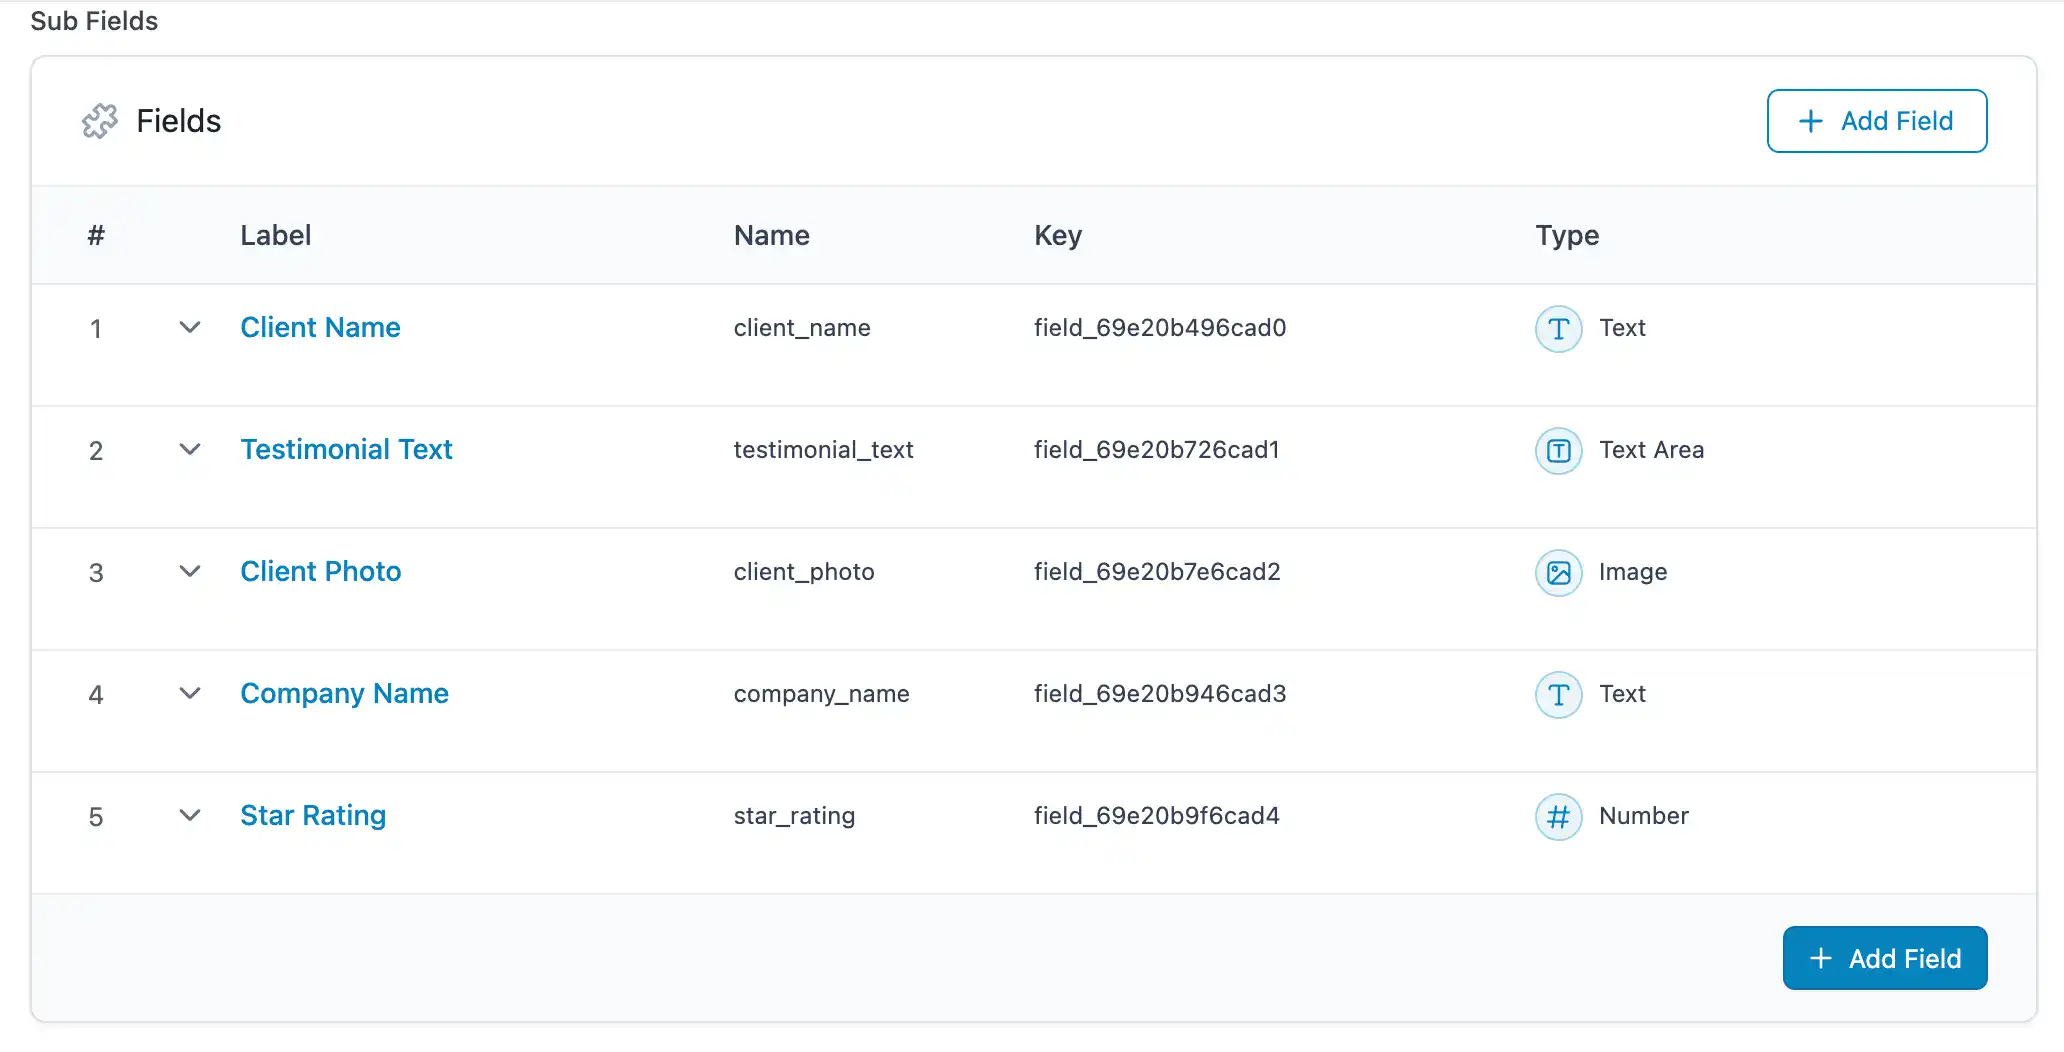
- Add the following subfields inside the Repeater:
- Client Name – Field Type: Text
- Testimonial Text – Field Type: Textarea
- Client Photo – Field Type: Image (set Return Format to Image Array)
- Company Name – Field Type: Text
- Star Rating – Field Type: Number (Min: 1, Max: 5) – optional
- Scroll down to Location Rules. Set: “Show this field group if Page is equal to [your target page].”
- Click Save Changes.
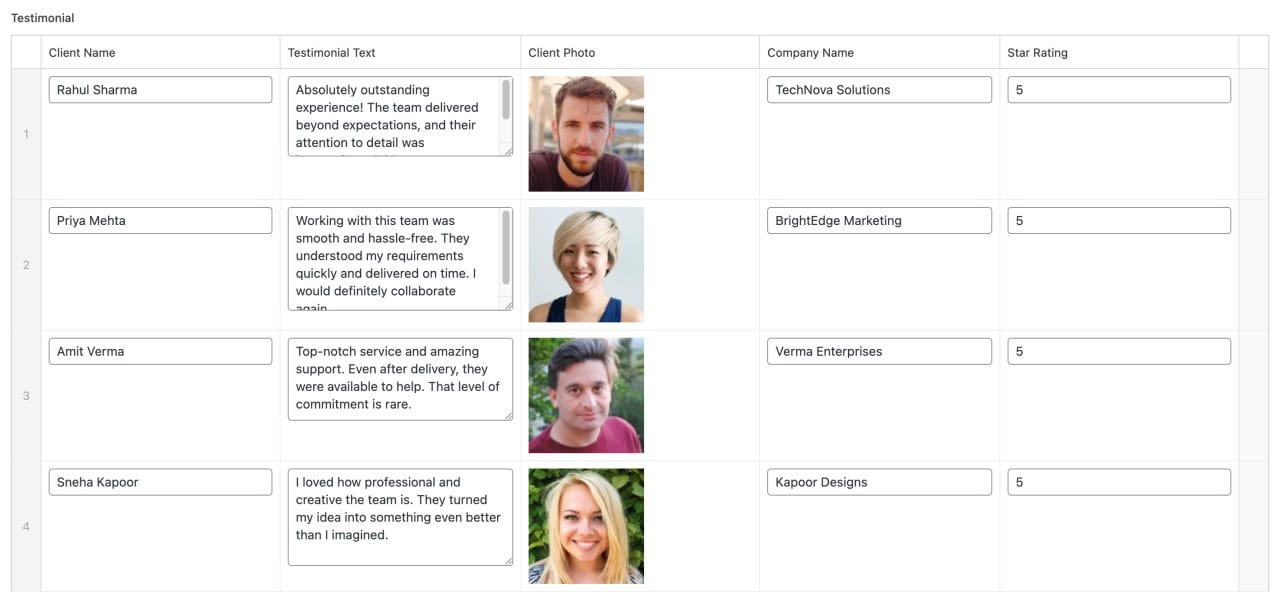
Now open the page you assigned in the location rules. Below the content editor, you will see the Testimonials field group. Click Add Testimonial to create your first row, fill in the subfields, and repeat for each testimonial.
ACF Repeater Field Complete Guide
How Do You Create a Testimonial Custom Post Type with ACF?
Follow these steps to create a dedicated Testimonials section in your WordPress admin:
- Go to ACF > Post Types > Add New.
- Set the Singular Label to “Testimonial” and the Plural Label to “Testimonials.”
- The Post Type Key will auto-generate as “testimonial.” Leave it as is.
- Under Advanced Configuration, make sure Title, Editor, and Featured Image are enabled under Supports.
- Click Save Changes.
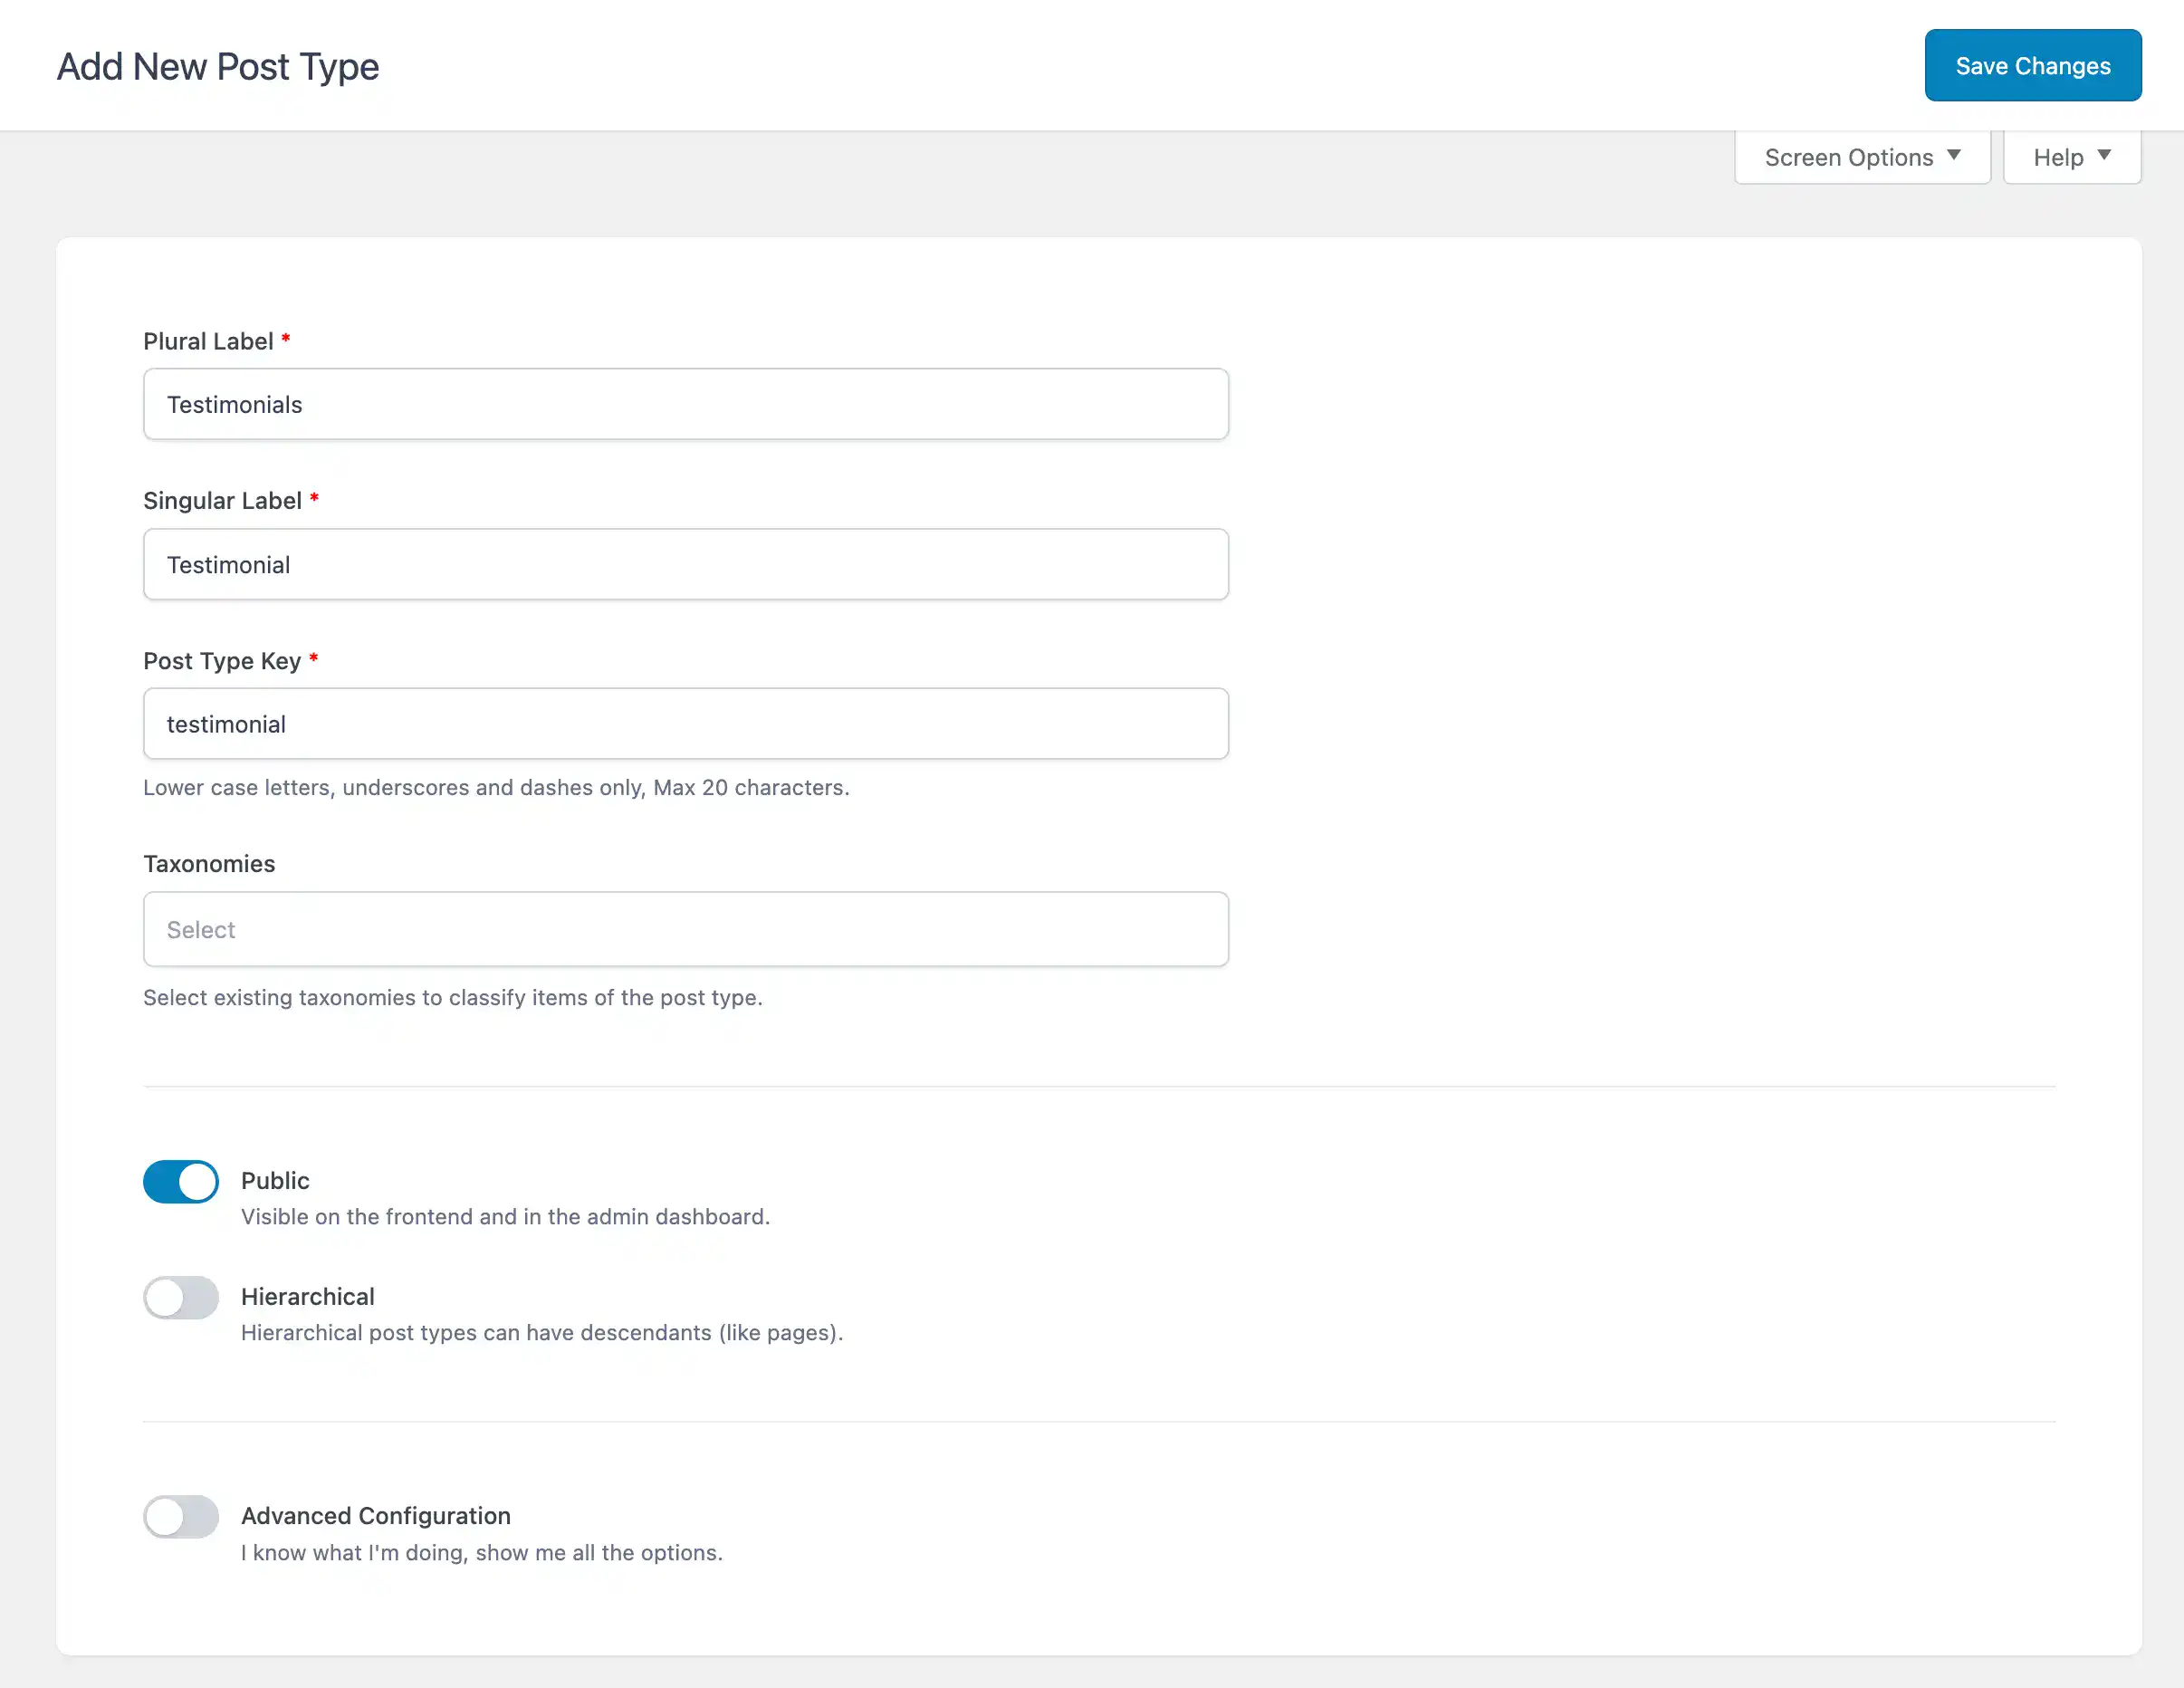
You will now see a “Testimonials” menu item in the WordPress admin sidebar.
How Do You Add Custom Fields to the Testimonial CPT?
The CPT approach uses the standard WordPress editor for the testimonial quote itself, and the Featured Image for the author’s photo. Custom fields handle the metadata:
- Go to ACF > Field Groups > Add New.
- Name the field group “Testimonial Details.”
- Add the following fields:
- Author Name – Field Type: Text
- Author Position – Field Type: Text
- Company Name – Field Type: Text
- Star Rating – Field Type: Number (Min: 1, Max: 5) – optional
- Scroll down to Location Rules. Set: “Show this field group if Post Type is equal to Testimonial.”
- Click Save Changes.
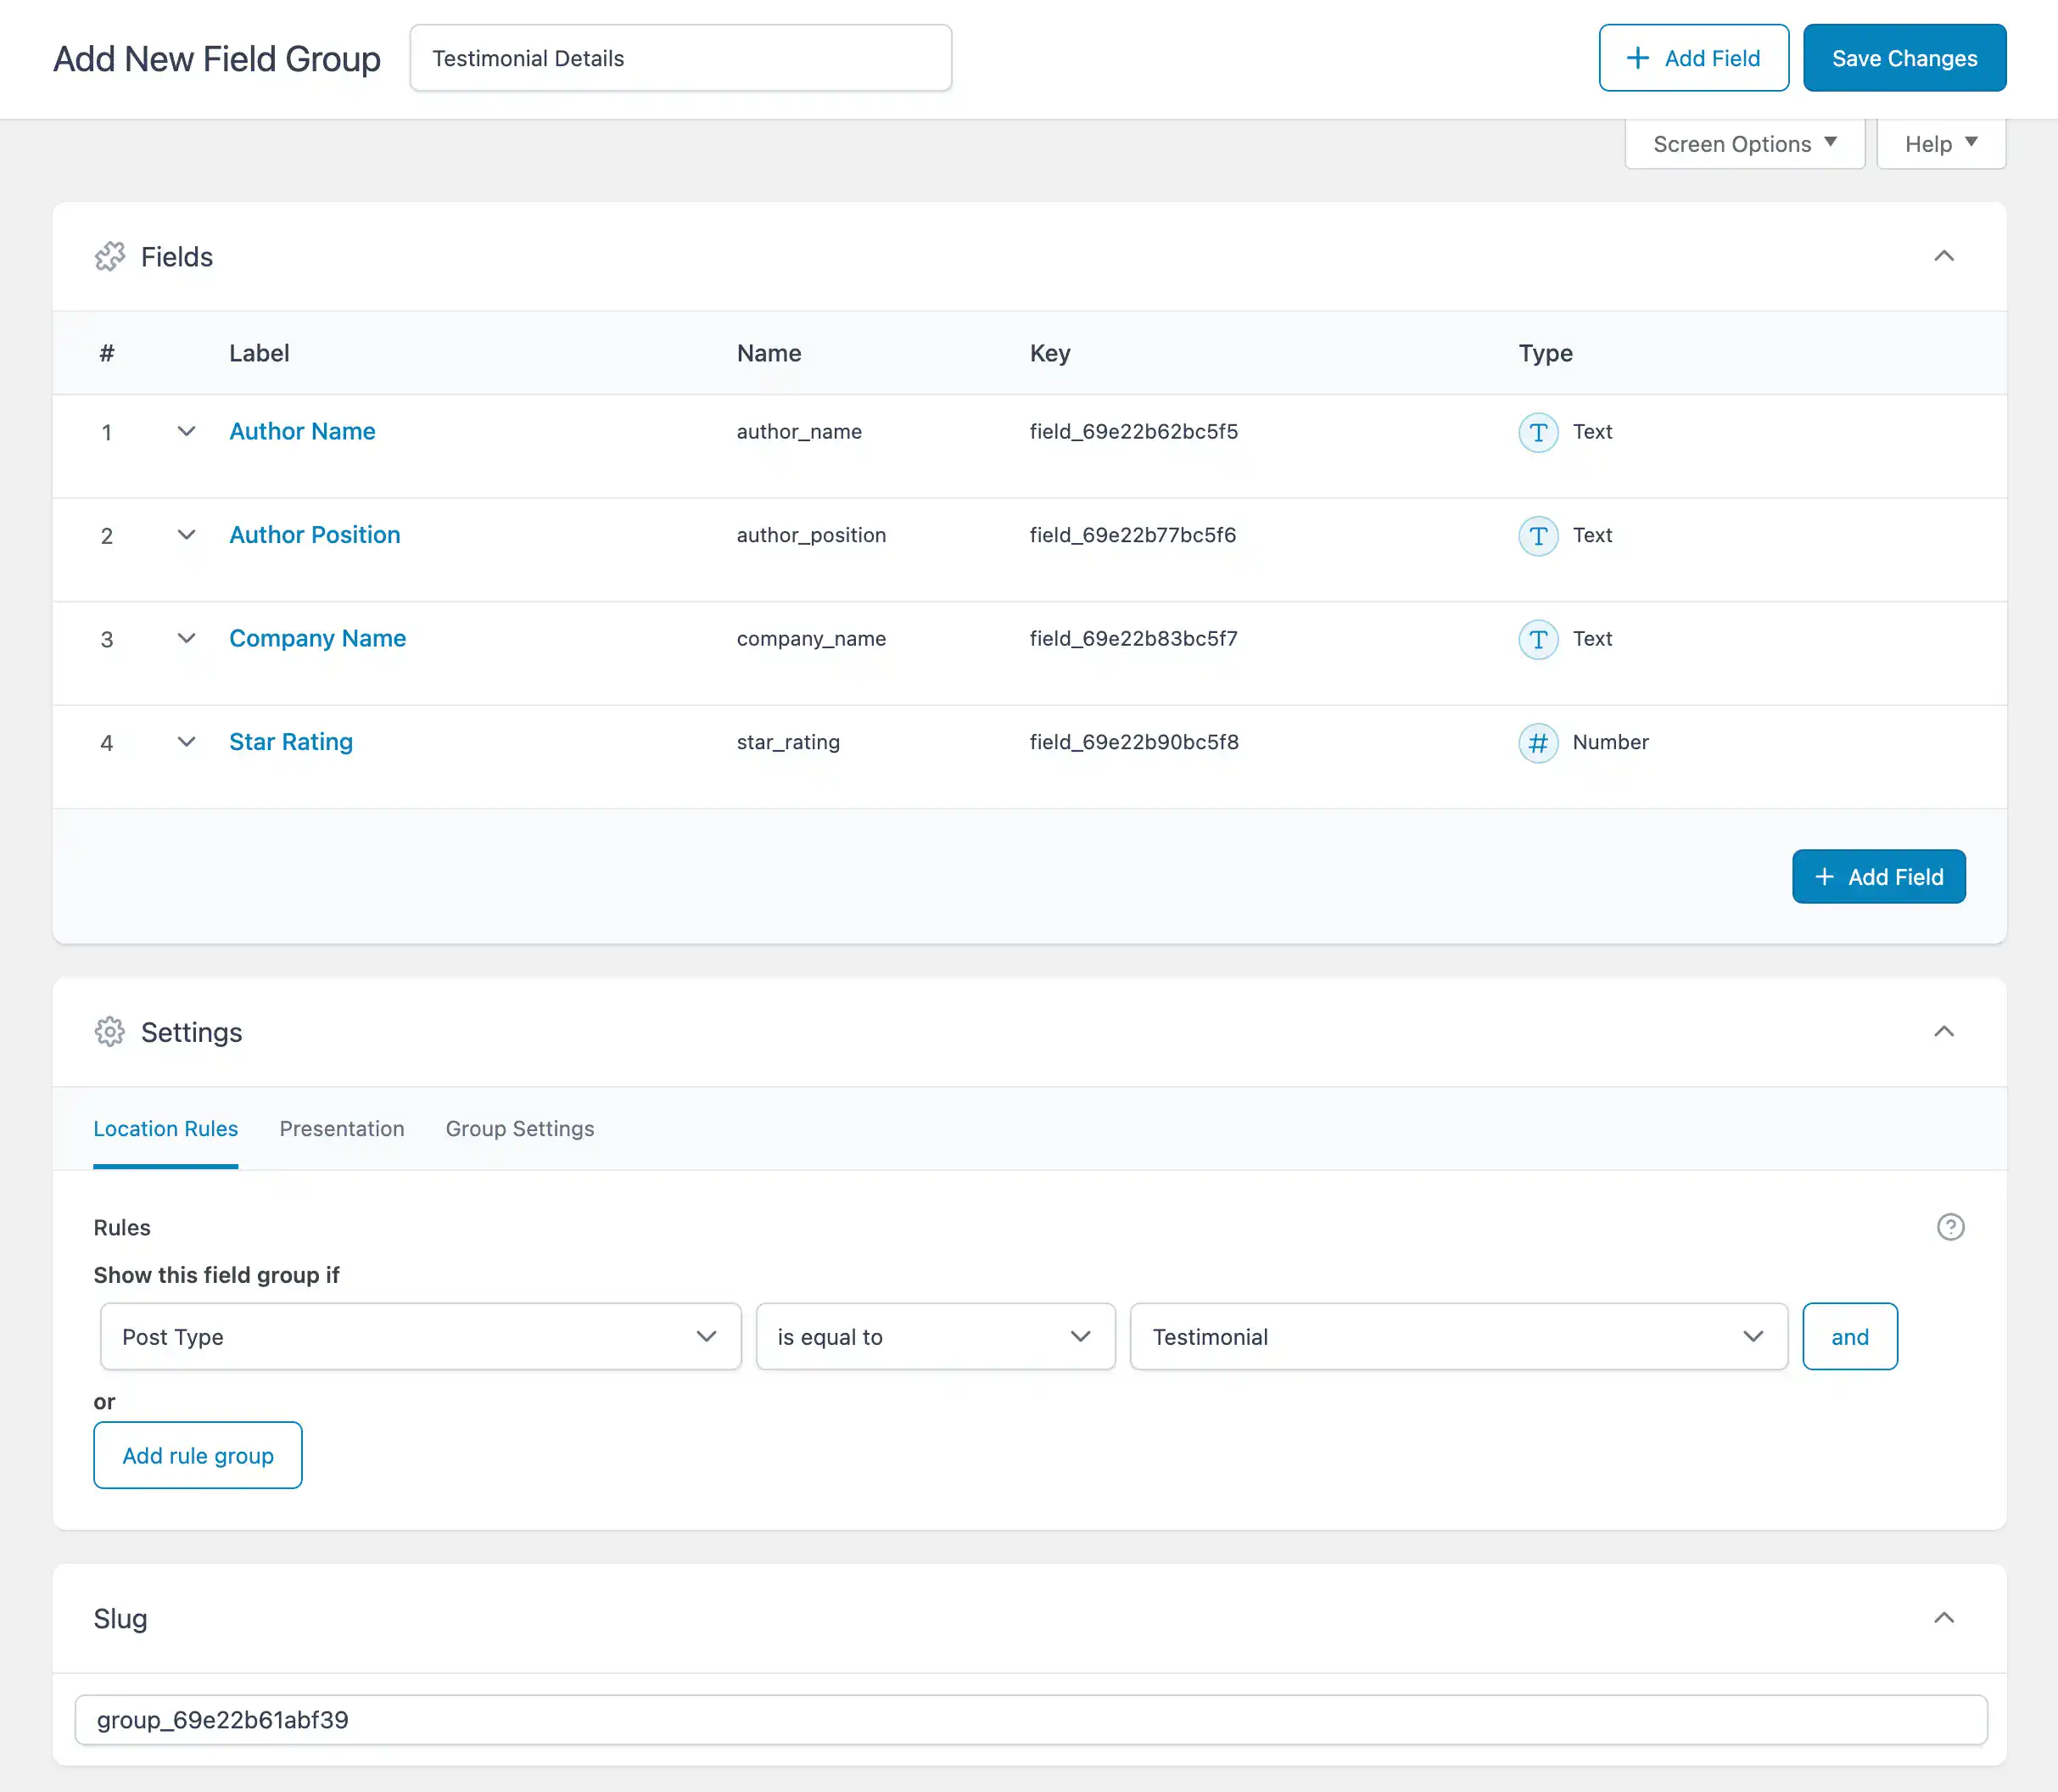
Note: With the CPT approach, the testimonial quote goes in the standard WordPress content editor, not a custom field. This gives editors the full formatting toolbar (bold, italic, links) and keeps things familiar.
How Do You Display ACF Testimonials in Elementor?
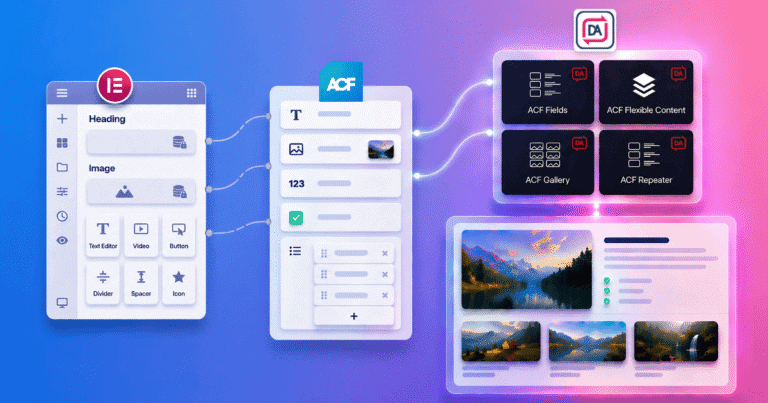
Dynific Addons for Elementor provides two widgets that handle each approach: DA – ACF Repeater for repeater-based testimonials, and Post Blocks Adv for CPT-based testimonials. Both let you design the layout visually in Elementor without writing code.
The display process has two parts for both approaches: first, you design a Block Layout template (the “skin” for a single testimonial card), then you place a widget on your page that loops through the data and applies that skin.
Displaying Repeater-Based Testimonials with Dynific Addons
Step 1: Create the Block Layout template.
- Go to DA Templates > Add New.
- Set: Render Mode = ACF Repeater Block, Field Location = Post, Repeater Field = “Testimonials”, Preview Post = [your page].
- Save and click Edit with Elementor.
Step 2: Design the single testimonial card.
Use the DA – ACF Fields V2 widget to pull in each subfield (Client Photo, Testimonial Text, Client Name, Company Name). Design the complete card layout inside a single parent container. Dynific Addons repeats this layout for every row automatically. Save the template.
Step 3: Place the Repeater widget on the page.
- Edit the target page in Elementor.
- Drag the DA – ACF Repeater widget onto the page.
- Select the Block Layout template you created.
- Choose a Skin: Grid, Carousel, Accordion, or Tabs.
- Configure columns, spacing, and responsive settings. Publish


Display Data with ACF Repeater Fields in Elementor.
Displaying CPT-Based Testimonials with Post Blocks Adv
Step 1: Create the Block Layout template.
Go to DA Templates > Add New. Set Render Mode = Post (Block Layout), Preview Post = [one of your Testimonial posts]. Save and edit with Elementor.
Step 2: Design the testimonial card.
- DA – Featured Image for the author’s photo
- DA – Post Content for the testimonial quote
- DA – ACF Fields V2 for Author Name, Position, Company
- DA – Title if you want the post title displayed
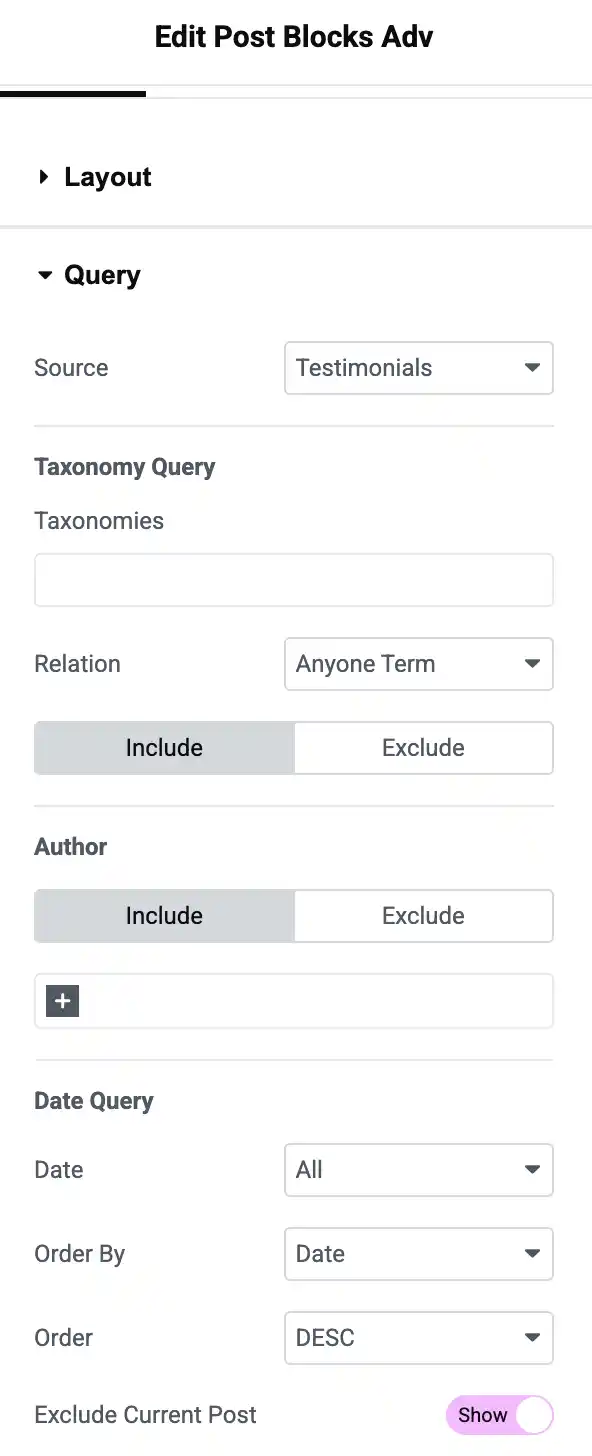
Step 3: Place Post Blocks Adv on the page.
- Edit the page in Elementor.
- Drag Post Blocks Adv widget onto the page.
- Set Query: Post Type = Testimonials.
- Select the Block Layout template. Choose Grid or Carousel.
- Set posts to display, columns, spacing. Publish.
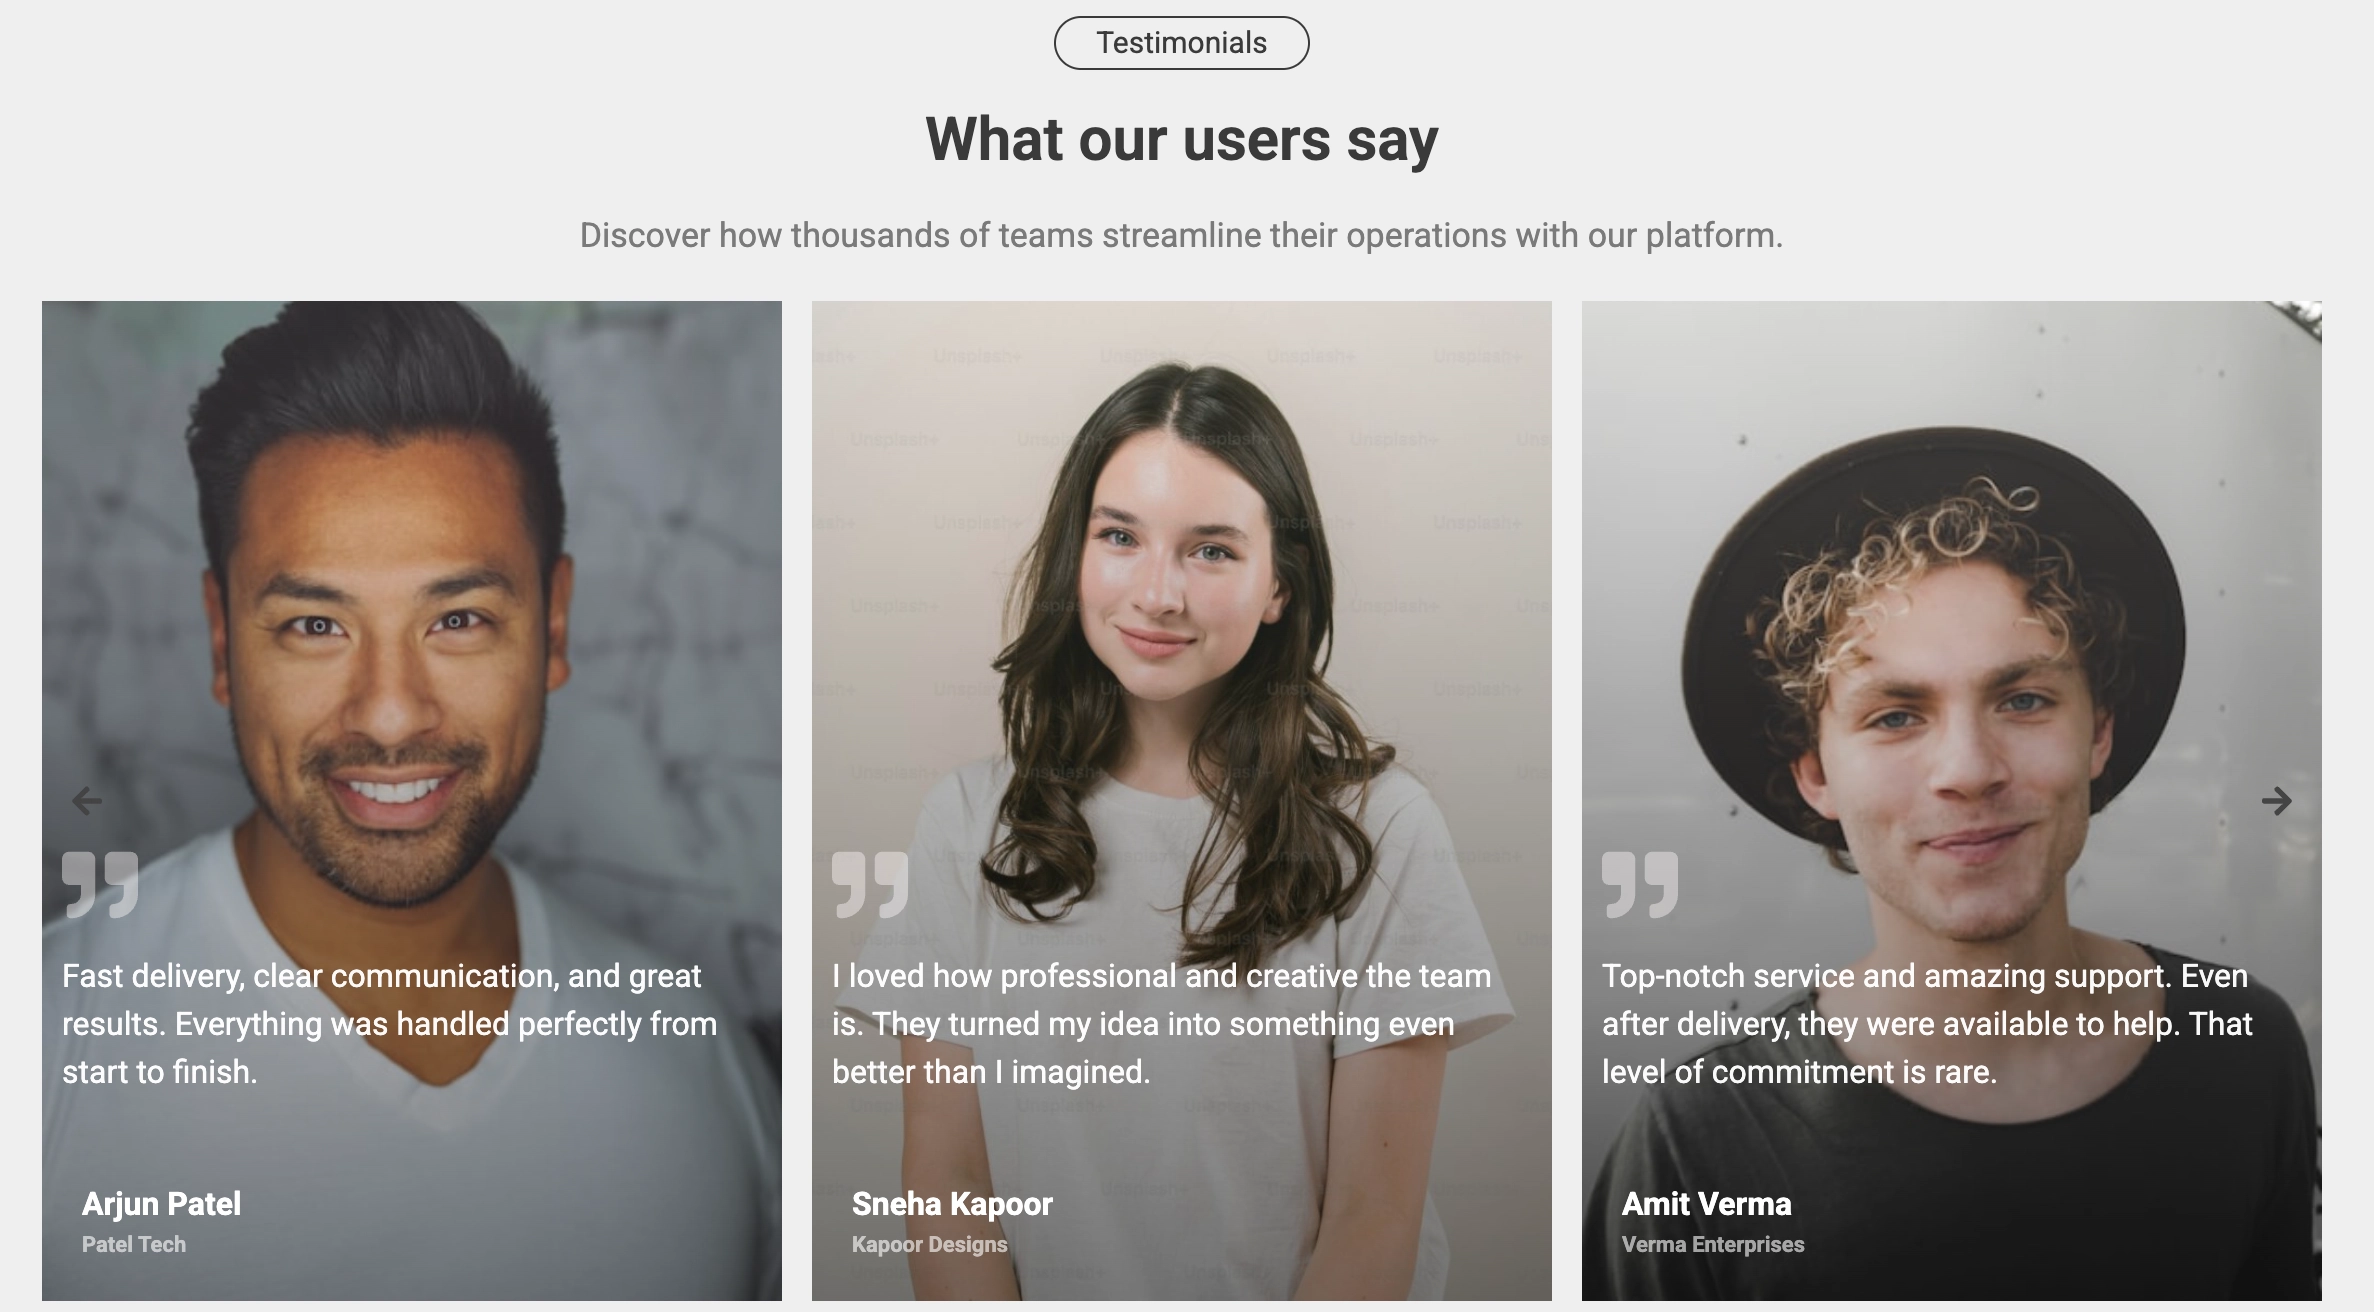
How Do You Style Testimonials as a Carousel or Grid?
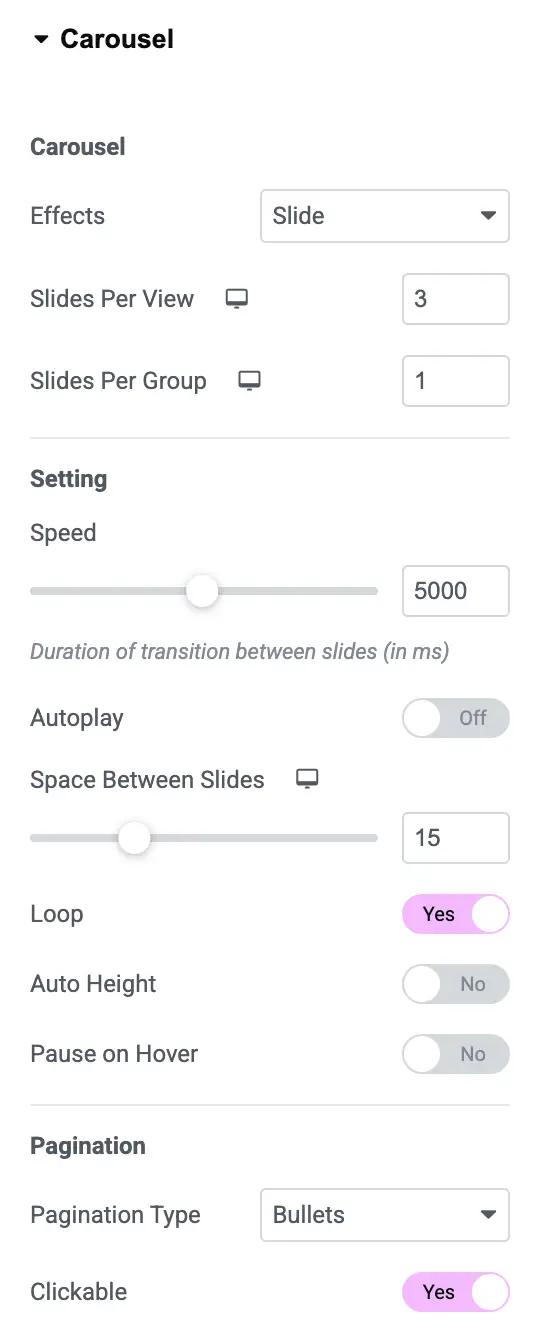
Dynific Addons for Elementor gives you four layout options: Grid, Carousel, Accordion, and Tabs. Grid and Carousel are the most common choices for testimonial sections.
Grid Layout Recommended Settings
- Columns: 2 or 3 on desktop, 2 on tablet, 1 on mobile
- Gap: 20-30px between cards
- Equal height: Enable for consistent card sizing
Carousel/Slider Recommended Settings
- Slides to show: 1 for narrow sections, 2 for wider layouts
- Autoplay: Enable with 4-5 second interval
- Navigation: Show both arrows and dots
- Infinite loop: Enable for continuous rotation
Pro Tip: Keep testimonial cards visually consistent. Use the same photo dimensions (square crops at 150x150px), limit quotes to 2-3 sentences, and always include the person’s full name and company. Inconsistent card heights make grids look unpolished.
What Are Common Mistakes When Building ACF Testimonials?
Three mistakes come up repeatedly when building ACF testimonial sections in Elementor:
- Using Repeater when a Custom Post Type is the better fit.
The ACF Repeater field is ideal for managing local, on-page data. A single list of testimonials on a homepage is a good use case. A list that needs to appear across several pages is not. If you find yourself duplicating Repeater data between pages, switch to a Custom Post Type. - Setting the wrong Image return format.
ACF Image fields offer three return formats: Image Array, Image URL, and Image ID. The DA – ACF Fields V2 widget expects Image Array to display photos correctly. If testimonial photos are not showing up, change the Return Format to “Image Array” in the field group settings. - Skipping the Block Layout template.
You cannot drag the DA – ACF Repeater widget or Post Blocks Adv onto a page and expect testimonials to appear without first creating a DA Template. The template is the skin. The widget is the loop that applies that skin to each data entry. Without the template, the widget has no layout to render.
Frequently Asked Questions
Do I need ACF Pro for testimonials, or does the free version work?
It depends on the approach. Creating a Testimonial Custom Post Type works with the free ACF plugin. The Repeater field approach requires ACF Pro, since the Repeater is a Pro-only field type. If you want the Repeater
method for single-page testimonials, you need an ACF Pro license starting at $49 per year.
Can I display ACF testimonials without Dynific Addons for Elementor?
Elementor Pro’s dynamic tags support individual ACF fields but do not support ACF Repeater fields natively. For Repeater-based testimonials, you need either custom PHP code or a plugin like Dynific Addons for Elementor that bridges the gap. Dynific Addons handles both Repeater and CPT display without any code.
How many testimonials can an ACF Repeater field hold?
ACF does not impose a hard limit on Repeater rows. You can set your own maximum in the field settings. However, very large numbers of rows (50+) can slow down the WordPress admin editor. For collections that grow beyond 15-20 testimonials, consider switching to a Custom Post Type.
Can I show different testimonials on different pages?
Yes, but only with the Custom Post Type approach. CPT testimonials are stored as individual posts and can be queried from any page using the Post Blocks Adv widget. You can filter by category or tag to show specific testimonials on specific pages. Repeater-based testimonials are tied to a single page.
How do I add star ratings to my ACF testimonials?
Add a Number field as a subfield in your Repeater (or as a custom field in your Testimonial CPT) with a minimum value of 1 and a maximum of 5. In Elementor, use the DA – ACF Fields V2 widget to display the value. You can style the number as text, or use CSS to render it as visual stars.
Wrapping Up
ACF gives you two clean approaches to building testimonial sections in Elementor: the Repeater field for small, single-page collections, and a Custom Post Type for growing libraries that need to appear across multiple pages. Both use Dynific Addons for Elementor to handle display without code, and both keep testimonial management inside the WordPress admin where it belongs.
Once the layout is set, adding a new testimonial takes 30 seconds: fill in the fields, upload a photo, and publish. No Elementor editing, no design risk, no wasted time.