How to Display ACF Fields in Elementor Without Elementor Pro
You have set up Advanced Custom Fields, created your field group, and opened Elementor to start building your template. Then you click the dynamic tag icon next to a widget and find it greyed out. The message is clear: you need Elementor Pro.
But, here is the good news. You can display ACF fields in Elementor without Elementor Pro, including advanced field types like Repeater, Flexible Content, and Gallery, and you do not need to write a single line of code. Dynific Addons for Elementor gives you two ways to do this: dedicated DA widgets built specifically for ACF display, and DA dynamic tags that work inside any native Elementor widget.
This tutorial covers both approaches, when to use each, and step-by-step instructions for every major ACF field type.
Why Can’t You Display ACF Fields in Elementor Without Elementor Pro?
Elementor’s dynamic tags feature is locked behind Elementor Pro. Dynamic tags are what let a widget pull its content from an external data source such as an ACF text field, an image field, or a URL field, so the widget updates automatically per post without manual editing.
Without Elementor Pro, that connection does not exist in free Elementor. Every widget shows only static content. Your ACF field data sits in the database with no way to surface it inside the Elementor editor.
Dynific Addons for Elementor solves this problem. It adds its own ACF display layer that does not depend on Elementor Pro, and it renders field values live in the editor so you can design with real content in front of you.
What Are the Two Ways Dynific Addons for Elementor Lets You Display ACF Fields?
Dynific Addons for Elementor gives you two distinct approaches, and understanding both helps you pick the right tool for each situation.
Approach 1: DA dedicated widgets. Dynific Addons for Elementor includes purpose-built widgets for ACF field display. DA – ACF Field handles individual fields, DA – ACF Repeater handles repeating data, DA – ACF Flexible Content handles modular layouts, and DA – ACF Gallery handles image galleries, and so on. Each widget is designed around the specific structure of its field type.
Approach 2: DA dynamic tags. Dynific Addons for Elementor also adds its own set of dynamic tags to Elementor’s tag system, grouped under ACF (DA). These tags let you bind ACF data to native Elementor widgets such as a Heading, an Image, or a Button, without using a dedicated DA widget at all. No Elementor Pro required.
Here is a quick overview of both:
| Approach 1: DA Widgets | Approach 2: DA Dynamic Tags | |
|---|---|---|
| How it works | Drag a dedicated DA widget and configure it | Use any native Elementor widget and bind it to an ACF field via a DA tag |
| Best for | Structured field display with fallback handling and sub-field support | Embedding ACF data into layouts built with native Elementor widgets |
| Supports Repeater / Flexible Content loops | Yes, via dedicated widgets | Tags cover sub-fields within block layouts, but looping requires the dedicated widget |
| Live preview in editor | Yes | Yes |
| Elementor Pro required | No | No |
The sections below walk through each approach in detail, followed by dedicated steps for Repeater, Flexible Content, and Gallery fields.
Approach 1: How Do You Display ACF Fields Using the DA – ACF Fields Widget?
The DA – ACF Fields widget is Dynific Addons for Elementor’s widget for displaying individual ACF field values. Drag it into a DA Template, point it at the ACF field key, set a fallback for empty fields, and style it using Style tab. It covers text, textarea, number, email, URL, image, file, select, checkbox, radio, true/false, date picker, color picker, oEmbed, WYSIWYG, and sub-fields inside Group and Repeater structures.
For this walkthrough, the example is a Property Listing custom post type with seven ACF fields.
Step 1: Create Your ACF Field Group
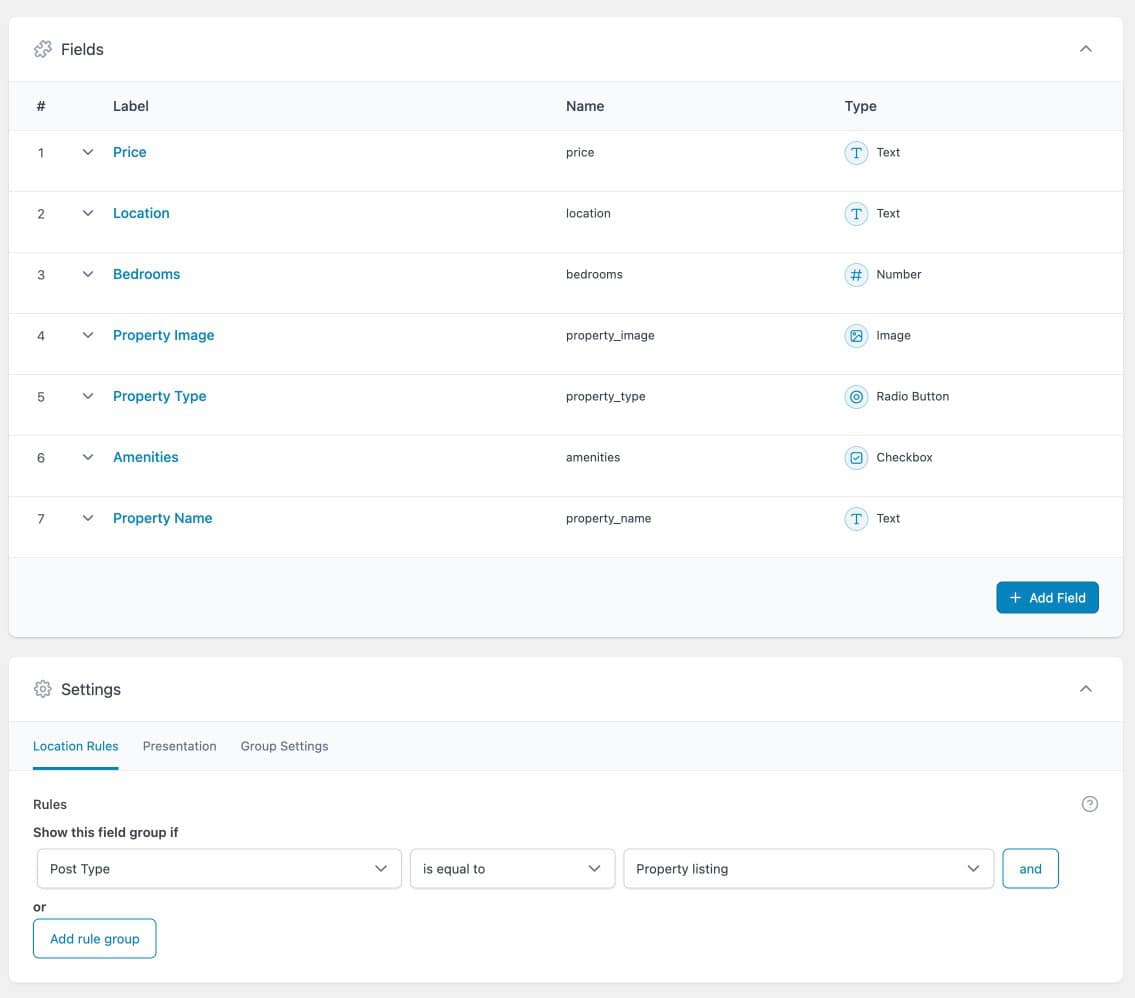
Go to ACF > Field Groups > Add New in the WordPress admin. Name the field group “Property Details” and add seven fields: Property Name (Text), Price (Text), Location (Text), Bedrooms (Number), Photo (Image) Property Type(radio), and amenities(checkbox).
Price, Location, and Bedrooms are straightforward single-value fields. Photo is an Image field. Property Type is a Radio Button field and Amenities is a checkbox field.
In the Location Rules section, set the rule to Post Type is equal to Property Listing. Save the field group.
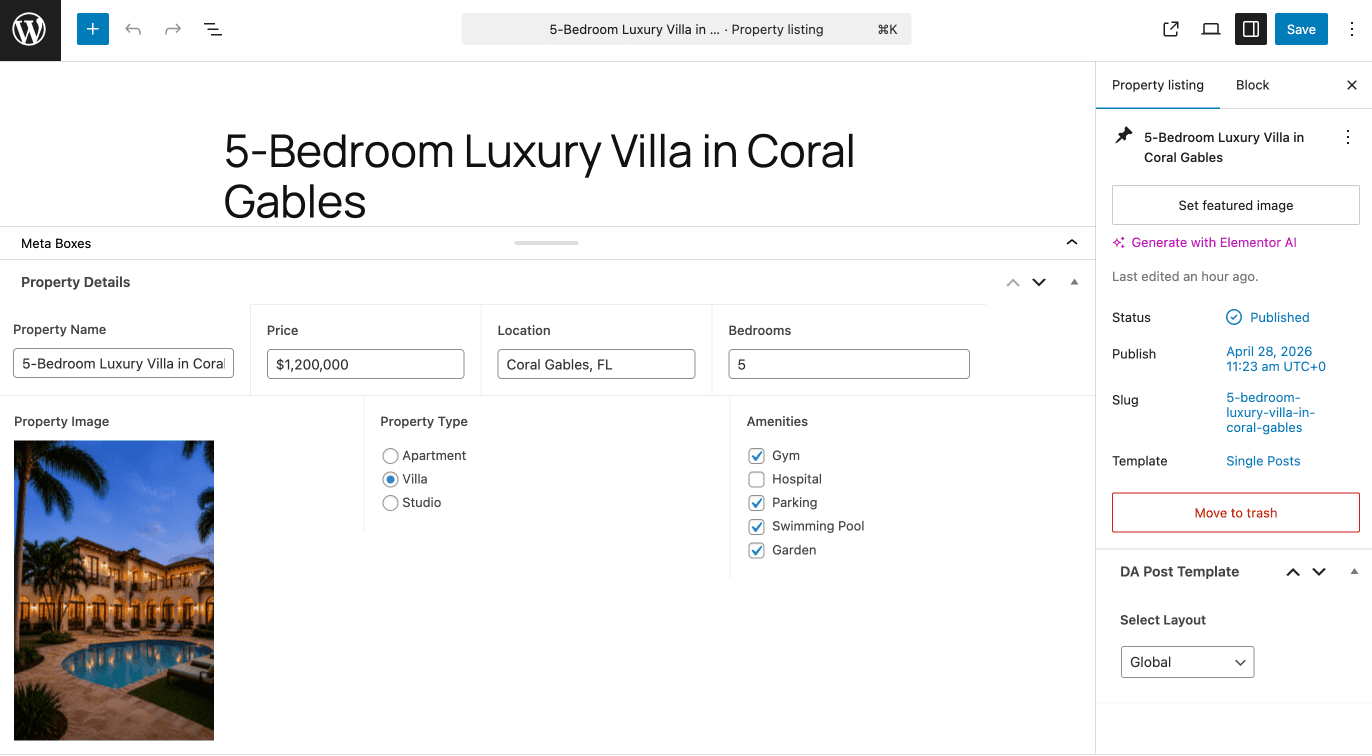
Open any Property Listing post and confirm the four fields appear. Add test data to at least one post so you have content to preview during design.
Step 2: Create a DA Template for the Single Post
Go to DA Templates > Add New. Set the template type to Single Post Template and select Property Listing as the post type. Save and click Edit with Elementor.
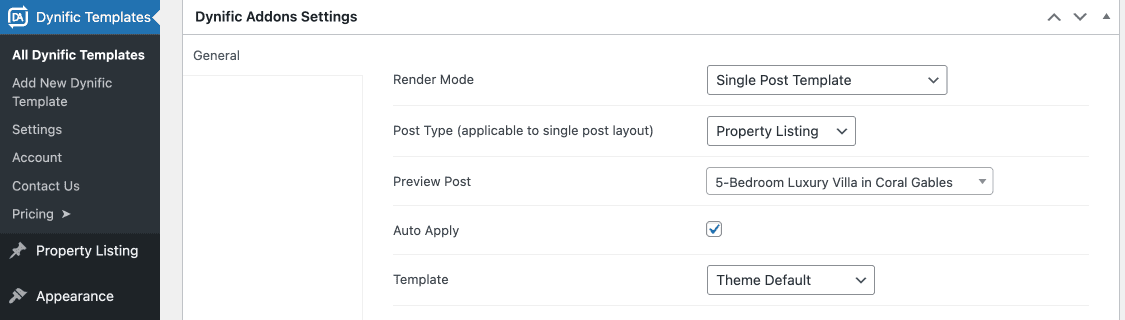
In the Preview Settings at the top of the editor, select a Property Listing post that has data. Dynific Addons for Elementor uses this to show live field values while you design.
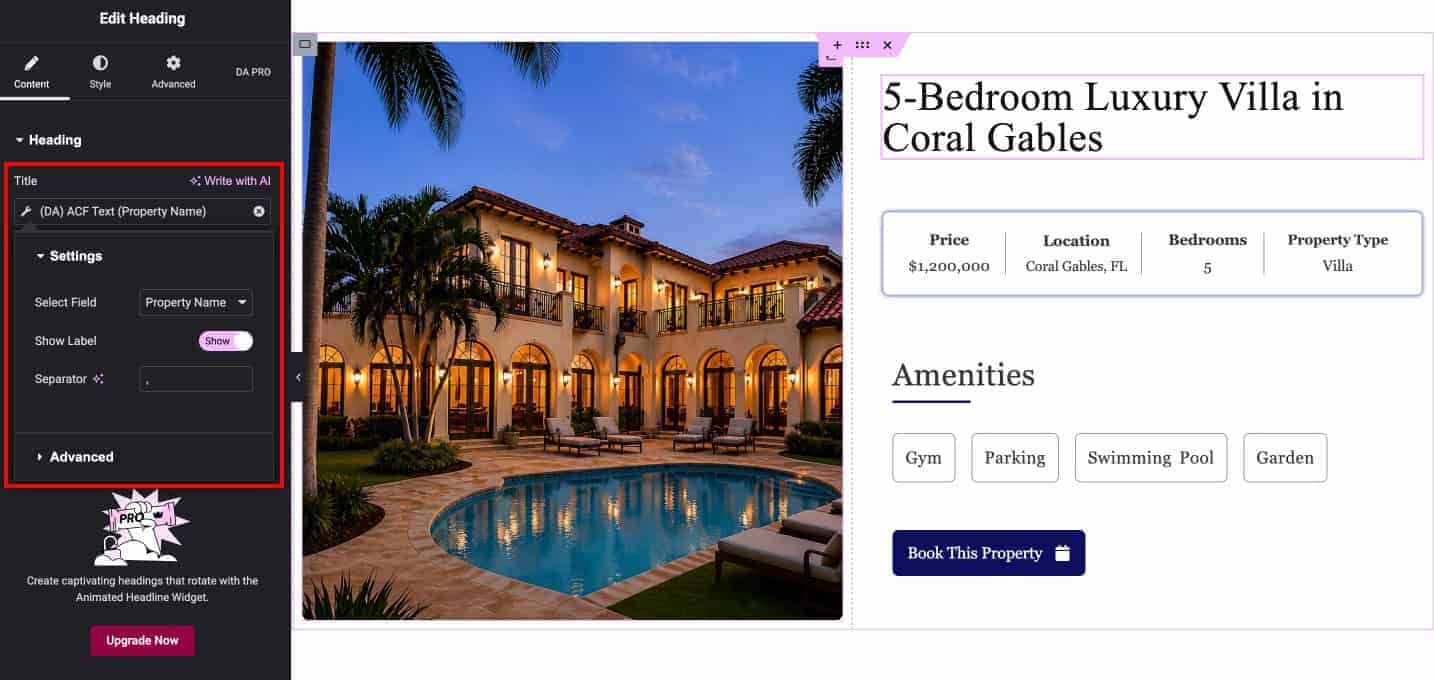
Step 3: Add and Configure the DA – ACF Fields V2 Widget
Search for “ACF Fields V2” in the Elementor widget panel and drag it into the template canvas.
In the widget’s Content tab, configure the following:
- Source: Post Field
- Field: enter the ACF field key exactly as it appears in ACF (for example, property_image for the Image field)
- Links To: set this if you want the field value to be clickable. Options include Post, Static URL, or Custom Field
- Enable Fallback: turn this on and define fallback content for when the field is empty

Style the widget using the Style tab. Repeat for each field. For Photo, configure the widget for Image type and select the image size. Arrange all fields into your property card layout.

Pro Tip
Use the fallback feature in DA – ACF Fields widgets to keep your layout consistent, even when some fields are empty.
Approach 2: How Do You Use DA Dynamic Tags With Native Elementor Widgets?
Dynific Addons for Elementor adds its own ACF dynamic tags to Elementor’s dynamic tag system. These tags appear in the tag dropdown inside any supporting native Elementor widget (Heading, Text Editor, Image, Button, and others), grouped under ACF (DA). Pick the tag that matches your field type, enter the field key, and the widget displays the live ACF value. No Elementor Pro required, and it renders live in the editor.
This approach is useful when you want a specific native Elementor widget for its styling controls and simply want to bind its content to an ACF field rather than replacing it with a DA widget.
Step 1: Add a Native Elementor Widget to Your DA Template
Inside a DA Template, drag in a native Elementor widget. For this example, use a Heading widget to display the property Price field.
Step 2: Open the Dynamic Tag Dropdown
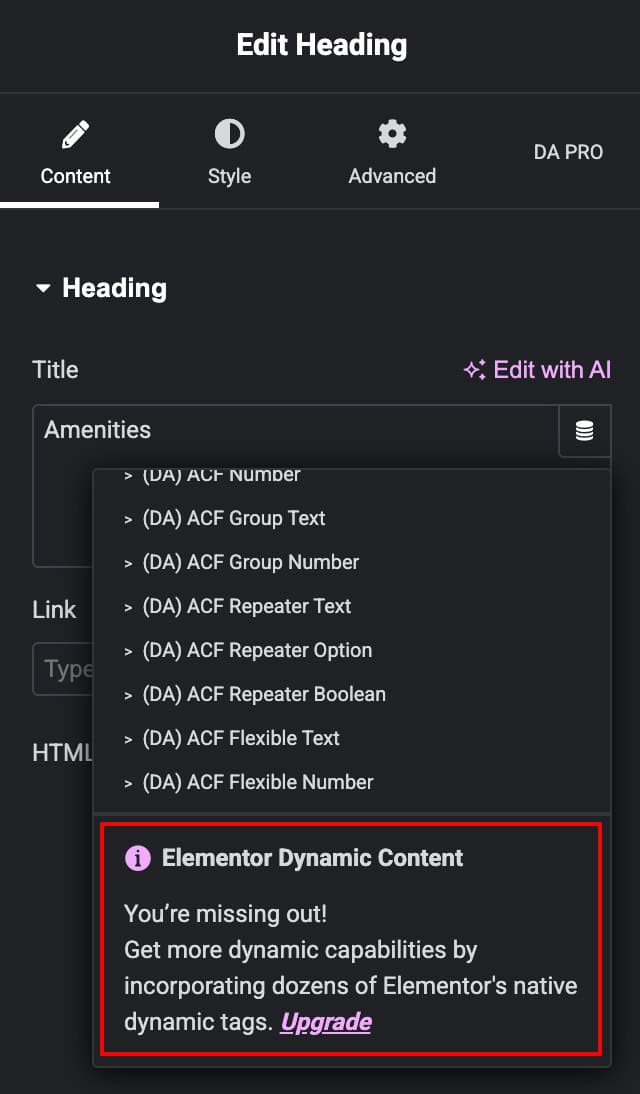
In the Heading widget’s Content tab, click the dynamic tag icon next to the Title input field. A dropdown appears. Scroll to the ACF (DA) group to see the full list of DA dynamic tags.
Choose the tag that matches the data type of your ACF field:
For the Price field (a Text field), select (DA) ACF Text.

showing ACF DA group with all
available tags
Step 3: Configure the Tag
Click the settings icon on the tag and choose the ACF field key, for example price. Add Before or After text if needed (for example, “From: ” before the price value).
The Heading widget now shows the live ACF field value in the editor. Style it using the Heading widget’s Style tab as normal.
Note
DA dynamic tags cover single field values. For looping through all rows of a Repeater field or rendering multiple Flexible Content sections, you need the dedicated DA – ACF Repeater and
DA – ACF Flexible Content widgets. The next three sections cover each of those field types step by step.
How Do You Display ACF Repeater Fields in Elementor ?
ACF Repeater fields require the dedicated DA – ACF Repeater widget. The process has two parts: design a block layout for a single repeater row, then place the DA – ACF Repeater widget to loop through all rows automatically.
Continuing with the Property Listing example, each listing has a Nearby Places section showing points of interest close to the property. Each nearby place has the same three pieces of information: a name, a category, and a distance. This repeating structure is exactly what a Repeater field handles.
The Field Group for this Section includes 6 fields: Property name (Text), Price (Text), Location (Text), Bedrooms (Number), Photo (Image), and nearby places(repeater). Add 3 sub fields inside the repeater.

Part 1: Design the Repeater Block Layout
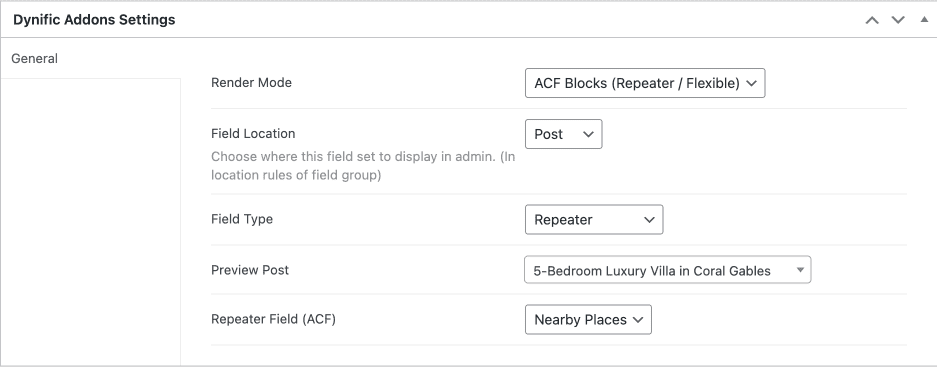
Go to DA Templates > Add New. Set Render Mode to ACF Repeater Block, select the Nearby Places Repeater field, and set Preview Post with repeater data. Save and click Edit with Elementor.
You are now designing a single repeater row. Add a ACF block(Repeater) layout and use DA – ACF Fields V2 widget for each sub-field. In each widget, set source as Post Field and set Parent Field Type to Repeater Field and choose the created repeater and its sub fields. Alternatively, use native Elementor widgets with DA dynamic tags. A Heading widget with (DA) ACF Repeater Text works well for text sub-fields.
Save the block layout.

Part 2: Place the DA – ACF Repeater Widget
In your post template, drag in the DA – ACF Repeater widget and configure:
- Block Layout: the repeater block layout created above
- Repeater Field (ACF): Team Members
- Skin: Grid, Carousel, Accordion, or Tabs
- Columns: set as needed

Repeater Fields
For a full walkthrough including all layout options, see the ACF Repeater guide.
How Do You Display ACF Flexible Content Fields in Elementor?
The DA – ACF Flexible Content widget maps each Flexible Content layout type to a separate Elementor-designed block template and renders the correct one per section automatically.
Before You Start: Set Up the Flexible Content Field in ACF
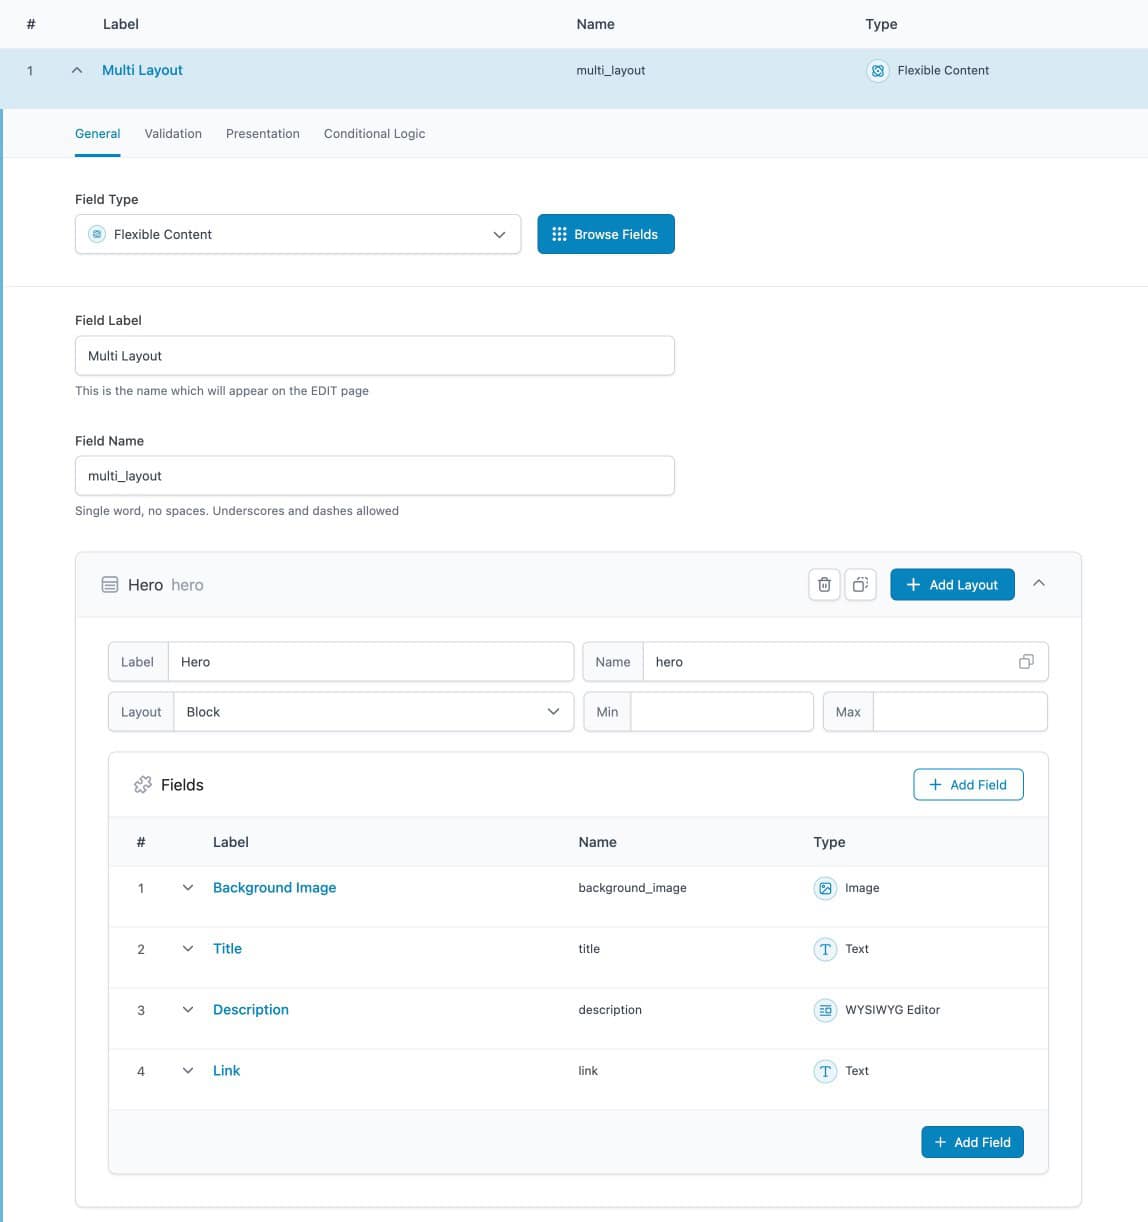
Go to ACF > Field Groups > Add New. Add a new field and set the Field Type to Flexible Content. Give it a label (for this example, “Multi Layout”).
Inside the Flexible Content field, click Add Layout for each content block type. Create two layouts:
- Hero with sub-field: Background Image (Image), Title (WYSIWYG Editor), Description (WYSIWYG Editor), and Link (Text)
- Services Layout with sub-fields: Service Image (image), Service Text (Text), and Service Description (WYSIWYG Editor)
Set the Location Rule to the correct post type and save. Open a post, add test rows using the layout picker, and fill in data for preview.
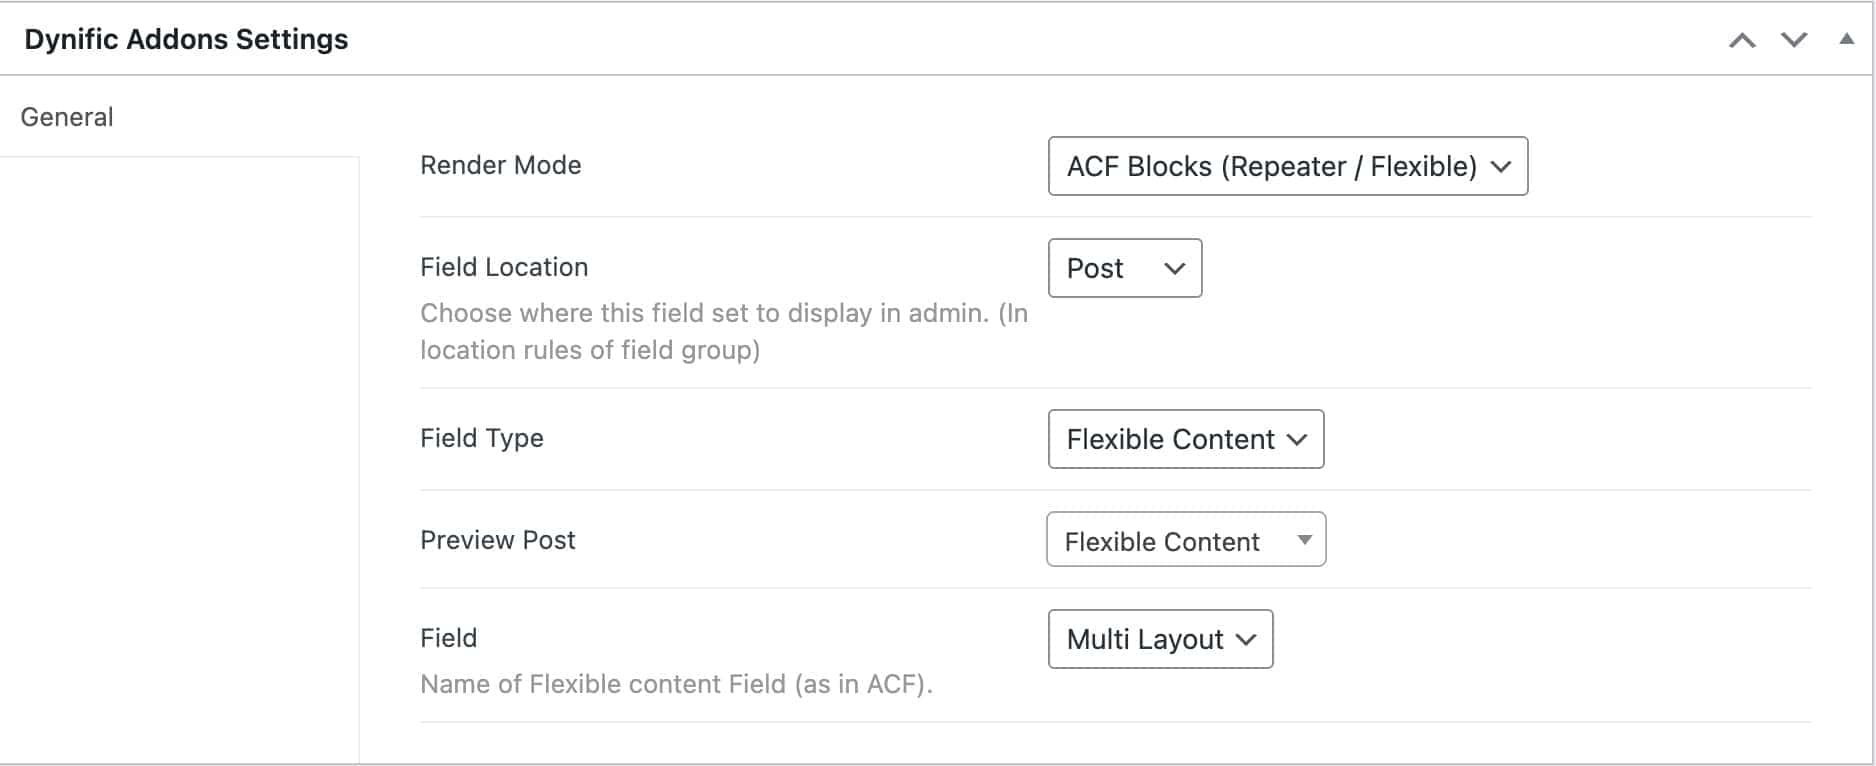
Step 1: Design a Block Template for Each Layout
For each Flexible Content layout, go to DA Templates > Add New, set Render Mode to ACF Flexible Content Block, and select the layout. Open in Elementor and design using DA – ACF Fields V2 widgets or native Elementor widgets with (DA) ACF Flexible Text or (DA) ACF Flexible Number tags for sub-fields. Save. Repeat for every layout type.
Step 2: Add the DA – ACF Flexible Content Widget
In your post template, drag in the DA – ACF Flexible Content widget. In Manage Layout & Templates, click Add Item for each layout and map it to its corresponding DA Template. Set the Flexible Field and choose a Skin (Grid or Carousel). Save.
If you need a complete walkthrough, check our step-by-step guide on using Flexible Content layout in Elementor.

How Do You Display ACF Gallery Fields in Elementor?
The DA – ACF Gallery widget displays an ACF Gallery field as a styled image gallery in Grid, Carousel, Justified Grid, or Smart Grid layouts, with lightbox support and full style controls.
In ACF, go to ACF > Field Groups, open the relevant field group, and confirm the Gallery field’s Return Format is set to Image Array. This is required before connecting it to the DA – ACF Gallery widget.
In your Elementor template, drag in the DA – ACF Gallery widget and configure:
- Custom Field Name: the ACF field key
- Skin: Grid, Carousel, Justified Grid, or Smart Grids
- Lightbox: enable for full-screen image viewing on click
- Columns and Gutter: set spacing as needed
Style captions, overlay, and image ratio using the Style tab.

Frequently Asked Questions
Do I need Elementor Pro to use Dynific Addons for Elementor’s ACF features?
No. All DA widgets and DA dynamic tags work with the free version of Elementor. Elementor Pro is not required for any ACF display features in Dynific Addons for Elementor. DA dynamic tags also render correctly in the Elementor editor inside DA Templates, which Elementor Pro’s own dynamic
tags do not always do.
Do I need ACF Pro to use Dynific Addons for Elementor?
For standard field types including Text, Number, Image, URL, Radio Button, Checkbox, and similar, the free version of ACF is sufficient. ACF Repeater and Flexible Content fields require ACF Pro, as those field types only exist in the Pro version. Dynific Addons for Elementor provides the Elementor display layer and does not replace ACF itself.
Can I use DA dynamic tags inside a Repeater block layout?
Yes. Inside a Repeater block layout, you can use native Elementor widgets bound to DA dynamic tags, for example a Heading widget with the (DA) ACF Repeater Text tag to display a text sub-field. The DA – ACF Repeater widget is still required to loop through all rows and render the block layout multiple times on the page.
What layout options are available for the DA – ACF Repeater widget?
The DA – ACF Repeater widget supports Grid, List, Carousel, Slider, Accordion, and Tabs layouts. You select the layout via the Skin setting in the widget panel.
What is the difference between DA – ACF Fields and DA – ACF Fields?
DA – ACF Fields is the current actively maintained version with expanded field type support, Group field handling for term archives, and improved compatibility with recent Elementor releases. New builds should use DA – ACF Fields V2. The original DA – ACF Fields widget remains available
for backward compatibility.
Conclusion
Displaying ACF fields in Elementor is not a Pro-only problem. With Dynific Addons for Elementor, you have two approaches at your disposal: the DA – ACF Fields V2 widget for dedicated field display with fallback handling and sub-field support, and DA dynamic tags for binding any native Elementor widget directly to an ACF field value. For advanced field types, the DA – ACF Repeater, DA – ACF Flexible Content, and DA – ACF Gallery widgets take care of everything from team grids to modular landing pages to image galleries, all built visually in Elementor, all without a Pro subscription.
Try Dynific Addons for Elementor and start building ACF-powered layouts today. If you are working with Repeater fields specifically, the complete ACF Repeater fields guide covers every layout option in detail.