ACF Repeater Field: Complete Guide (Setup, Display, Elementor)
The ACF Repeater field solves one of the most common content structure problems in WordPress: what do you do when the same set of fields needs to repeat? Team members, testimonials, pricing tiers, FAQs, service features, and event schedules. Instead of duplicating field groups manually or hard-coding content into templates, the Repeater field lets you define a set of subfields once and let editors add as many rows as they need.
This guide covers everything from setup to display: how to create a Repeater field, how to configure its subfields, how to populate it with content, how to display it in Elementor without code, and how nested repeaters work.
If you are looking for a full overview of how to display ACF fields in Elementor without
Elementor Pro, including basic fields, dynamic tags, Flexible Content, and Gallery, see the
complete display guide first.
Is ACF Repeater Field Free or Pro?
PRO ONLY
The Repeater field is only available in ACF Pro. The free version of ACF does not
include it. You need an active ACF Pro license to create and use Repeater fields on your
site.
ACF Pro includes the Repeater field, Flexible Content field, Options Pages, Gallery field, and ACF Blocks. If you are currently on the free version and need Repeater functionality, you will need to upgrade at ACF Pro.
The free version of ACF covers standard field types: Text, Textarea, Number, Email, URL, Image, File, Select, Checkbox, Radio, True/False, Link, Post Object, Relationship, Taxonomy, and User. The Repeater field is not among them.
What Is the ACF Repeater Field?
The ACF Repeater field is a container field that holds a group of subfields that can be repeated as many times as needed. Think of it as a table: you define the columns (subfields) once, and editors add as many rows as the content requires.
A testimonials section is the classic example. Instead of creating separate field groups for Testimonial 1, Testimonial 2, and Testimonial 3, you create one Repeater field with subfields for Client Name, Feedback, and Photo. Editors can then add as many testimonial rows as they want from the WordPress admin, with no developer involvement.
Any ACF field type can be used as a subfield inside a Repeater, including other Repeater fields. Common subfield combinations:
- Text + Image: Team members, testimonials, partner logos
- Text + URL + Icon: Feature lists, service cards
- Title + Description + Price: Pricing tiers, packages
- Date + Title + Description: Event schedules, timelines
How to Set Up an ACF Repeater Field
This walkthrough uses a testimonials section as the example, with three subfields: Client Name,
Testimonial Text, and Client Photo.
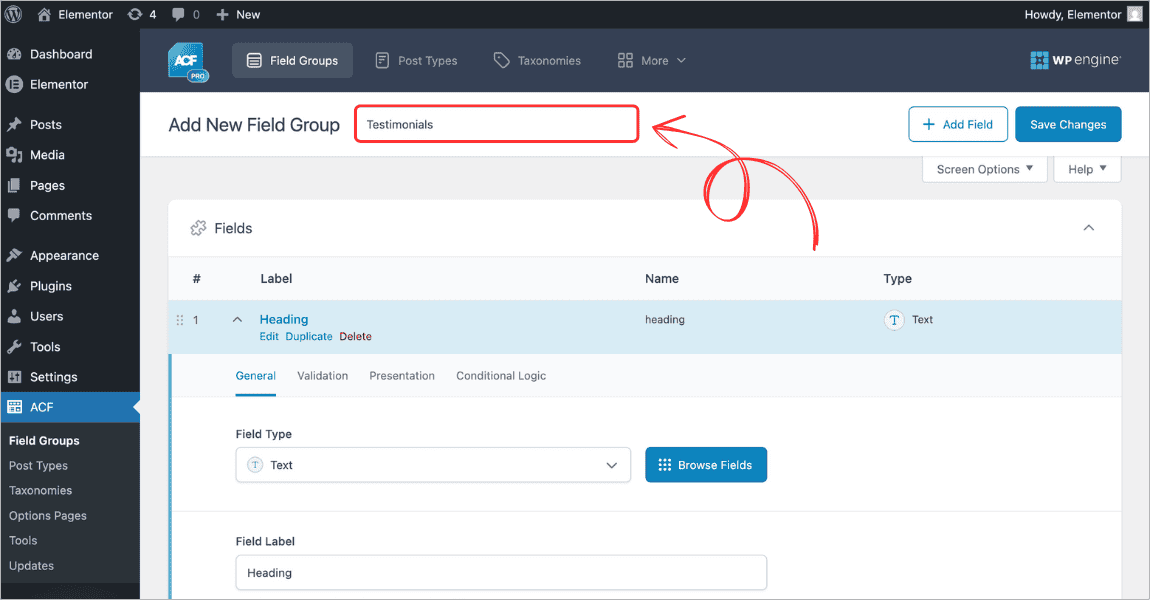
Step 1: Create a field group
- In your WordPress dashboard, go to ACF > Field Groups
- Click Add New
- Give the field group a descriptive name, for example: Testimonials
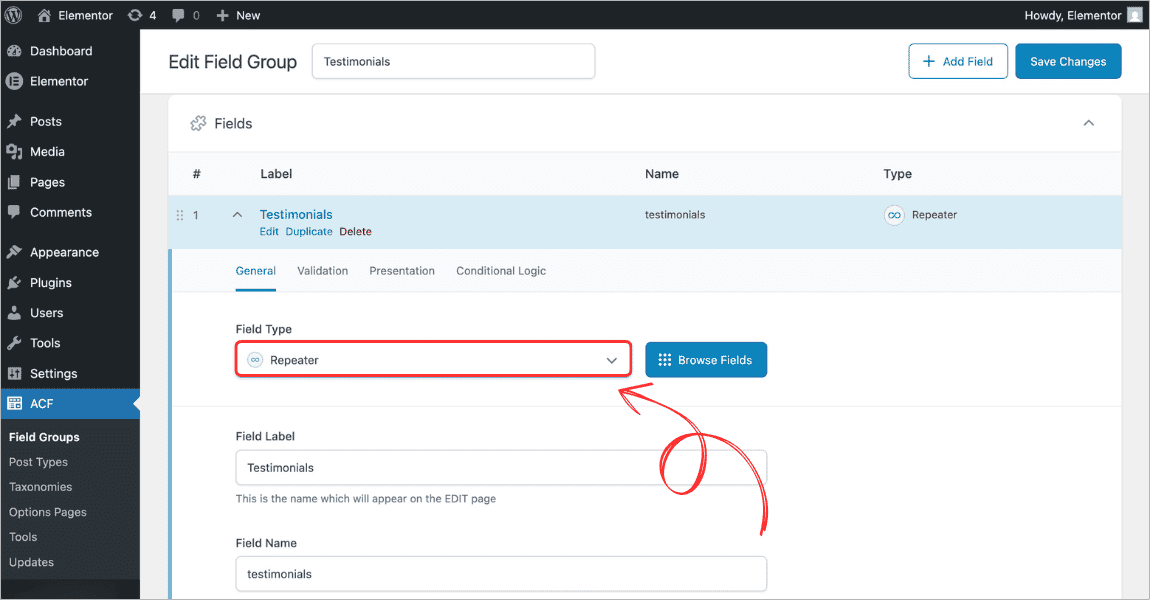
Step 2: Add the Repeater field
- Click Add Field
- Set the Field Type to Repeater
- Give it a Field Label, for example: Testimonials
- The Field Name auto-populates as testimonials — this is the key used when displaying data
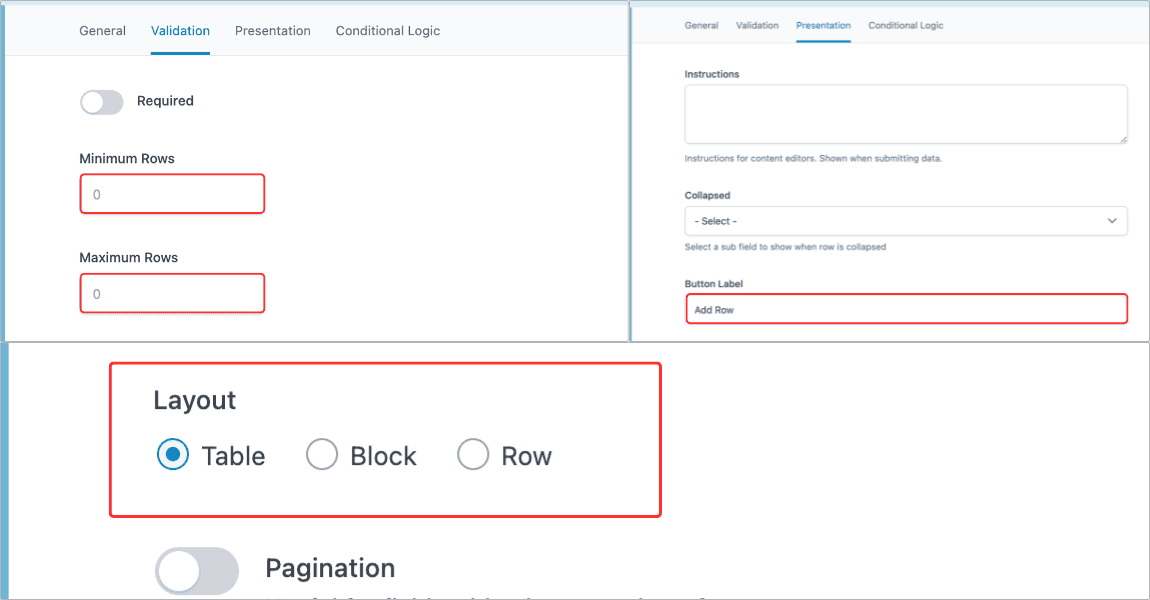
Step 3: Configure Repeater field settings
Below the field label and name, the Repeater field has a handful of settings worth knowing:
| Min Rows | Minimum number of rows that must be added before the field group can be saved. Leave blank for no minimum. |
| Max Rows | Maximum number of rows an editor can add. Leave blank for unlimited. |
| Layout | Controls how subfields appear in the admin. Table: subfields as columns, best for short text. Block: rows stack vertically, better for textareas. Row: compact inline display. |
| Button Label | The text on the ‘add row’ button. Change from the default ‘Add Row’ to something descriptive like ‘Add Testimonial’ to make the admin clearer for editors. |
Step 4: Add subfields to the Repeater
Inside the Repeater field, click Add Sub Field to add the fields that will repeat with each row. For the testimonials example, add three subfields:
- Client Name — Field Type: Text
- Client Photo — Field Type: Image (set Return Format to Image Array
- Client Message — Field Type: Textarea

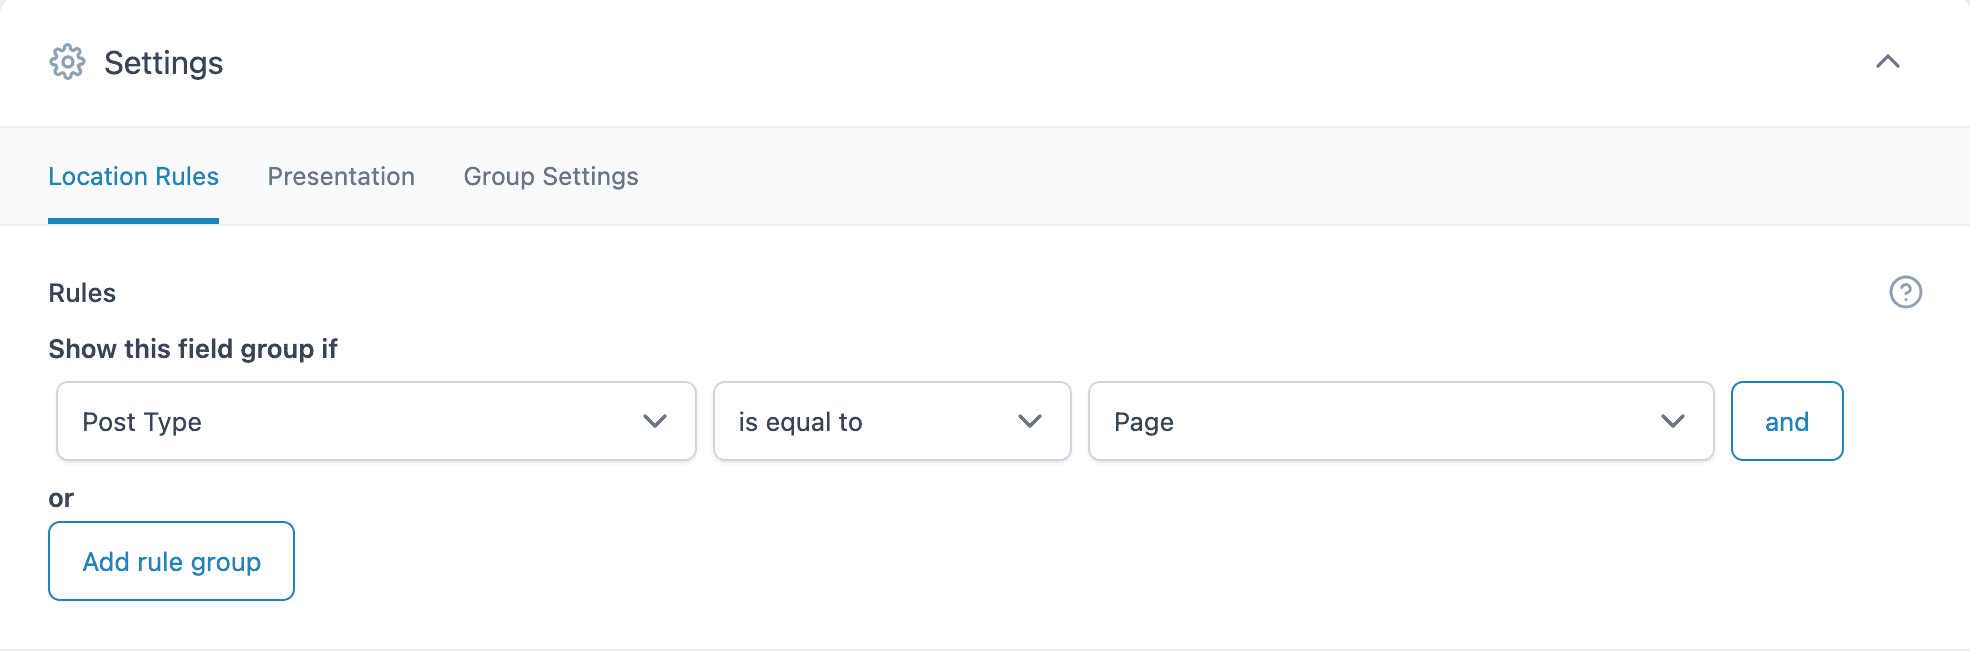
Step 5: Set the location rules
Scroll down to the Location Rules section to tell ACF where this field group should appear. To show it on all pages:
- Set: Post Type is equal to Page
Or to show it on a specific page only:
- Set: Page is equal to [Your Page Name]
Step 6: Save the field group
Click Save Changes (or Publish if it is a new field group). The Repeater field is now active and will appear on the pages or post types matching your location rules.
How to Populate Repeater Field Data
Once the field group is set up and assigned to a post or page, editors can fill in data from the standard WordPress edit screen.
- Open the page or post where the field group appears
- Scroll down to find the Testimonials field group below the content editor
- Click Add Testimonial (or your custom button label)
- Fill in the subfields for the first row: Client Name, Client Message, and Client Photo
- Click Add Testimonial again to add a second row
- Repeat as needed, then save or update the post
Rows can be reordered by dragging the handle on the left side of each row. Individual rows can be deleted using the delete icon on the right.

How to Display ACF Repeater Fields in Elementor
Elementor does not natively support ACF Repeater fields in its dynamic data system. Dynific Addons for Elementor bridges that gap completely, letting you build the repeater layout visually without writing any code.
Dynific Addons provides two widgets for this:
DA – ACF Repeater: The main widget that loops through repeater rows and renders each one using a layout template you design.
DA – ACF Fields V2: Used inside the repeater block layout to pull in individual subfield values.
The process has two parts: design the layout for a single repeater row (the block layout), then place the Repeater widget on the page.
Part 1: Design the repeater block layout
- Go to DA Templates > Add New
- Set Render Mode to ACF Blocks Repeater
- Set Field Type to Repeater
- Select the Repeater Field — for example: Testimonials
- Set Preview Post to a page with repeater data populated
- Save settings and click Edit with Elementor
- Build the layout for a single row using DA – ACF Fields V2 widgets for each subfield
- Style the layout and save the template

Part 2: Add the Repeater widget to your page
- Open the page in the Elementor editor
- Search for the DA – ACF Repeater widget and drag it onto the page
- In widget settings, set Block Layout to the template you just designed
- Set Repeater Field Name to your Repeater field (Testimonials)
- Choose a Skin: Tabs, Accordion, or List
- Adjust skin settings (columns, spacing, navigation) and save the page

Available display skins
| Grid | Displays rows in a responsive column layout. Best for team members, testimonials, service cards. Set columns for desktop, tablet, and mobile separately. |
| Carousel | Displays rows as a sliding carousel with navigation arrows and dot indicators. Best for testimonials and portfolio entries. |
| Accordion | Displays rows as collapsible accordion items. Best for FAQs, step lists, or content where space is limited. |
| Tabs | Displays rows as tabbed content sections. Best for pricing tiers, platform comparisons, or categorised content. |
PRO TIP
When an editor adds a new row to the ACF Repeater field in the admin, it appears on the page
automatically with no further changes needed in Elementor.
Working With Nested Repeaters
A nested repeater is a Repeater field that exists as a subfield inside another Repeater field. This is useful when each row in the parent repeater needs its own repeating set of data.
A pricing table is a common example: the parent repeater holds hosting platforms (Digital Ocean, Vultr, Linode), and inside each platform is a child repeater for the monthly plans, each with a price and feature list.
Setting up nested repeaters in ACF
- Create the parent Repeater field (for example: Hosting Platforms)
- Add the standard subfields for the parent (Platform Name, Description)
- Click Add Sub Field again and set the field type to Repeater — this is the child Repeater (for example: Plans)
- Add subfields to the child Repeater (Plan Name, Monthly Price, Features)
- Set location rules and save

Displaying nested repeaters in Elementor with Dynific Addons
Create a separate block layout template for each level of the repeater:
- Child template (Plans): Designs how each individual plan row looks
- Parent template (Platforms): Designs how each platform section looks, and uses the DA – ACF Repeater widget internally pointing at the Plans child repeater Place the parent DA – ACF Repeater widget on the page pointing at the Platforms parent repeater. This gives full visual control over each level of nested data, all without writing PHP.
NOTE
For a detailed step-by-step walkthrough of nested repeaters with a hosting price table example, see the guide on ‘How to Display ACF Nested Repeaters in Elementor‘.
Common Use Cases for ACF Repeater Fields
The Repeater field works for any content that repeats in sets. Some of the most common implementations:
| Testimonials and reviews | Client name, photo, review text, star rating. Each row is one testimonial. Renders as a grid or carousel. |
| Team member sections | Name, role, photo, bio, social links. Each row is one person. Common on About pages and agency sites. |
| FAQ sections | Question and Answer subfields. Each row is one FAQ pair. Combine with the Accordion skin in Dynific Addons for a collapsible display. |
| Pricing tables | Plan name, price, billing period, feature list. Each row is one pricing tier. Often the child of a parent repeater grouping plans by category. |
| Service or feature lists | Icon, title, short description. Each row is one feature card. Renders cleanly in a multi-column grid. |
| Event schedules | Date, time, event name, location. Each row is one event. Can be ordered chronologically using the drag handles in the admin. |
| Portfolio entries | Project name, client, image, description, tags. Each row is one project. Renders as a filterable grid. |
FAQs on the ACF Repeater Field
Is the ACF Repeater field free?
No. The Repeater field is only available in ACF Pro. The free version of ACF does not include it. You need an active ACF Pro license to create and use Repeater fields.
How many rows can I add to an ACF Repeater field?
ACF does not impose a hard limit on the number of rows. You can set your own maximum in the field settings using the Max Rows option. For very large datasets, consider whether a custom post type might be a better content structure than a Repeater with hundreds of rows.
Can I display ACF Repeater fields in Elementor without coding?
Yes. Dynific Addons for Elementor includes the DA – ACF Repeater widget which lets you design the layout for repeater rows visually and display them as a grid, carousel, accordion, or tabs. No PHP required.
What field types can I use inside a Repeater?
Any ACF field type can be a subfield, including Text, Textarea, Image, File, Select, Checkbox, WYSIWYG, Link, Post Object, and even another Repeater field for nested structures.
Can I nest Repeater fields inside each other?
Yes. You can add a Repeater field as a subfield inside another Repeater. This is called a nested repeater and is useful for multi-level data like pricing tables, feature comparisons, or itineraries. Dynific Addons supports displaying nested repeaters in Elementor without code.
Can I use ACF Repeater fields on custom post types?
Yes. In the Location Rules section of the field group, set the rule to match your custom post type. The Repeater will then appear on every post of that type in the admin.
Can I reorder rows in an ACF Repeater?
Yes. Each row in the Repeater has a drag handle on the left side. Grab and drag to reorder rows. The order saved in the admin is the order they display on the frontend.
What is the difference between the Repeater field and the Flexible Content field?
The Repeater field repeats the same set of subfields for every row. The Flexible Content field lets you define multiple different layouts and add them in any order. For content where every row has the same structure, use the Repeater. For content where each row can have a different structure, use Flexible Content.
Does the Repeater field work with Elementor Pro dynamic tags?
Elementor Pro’s built-in dynamic tags do not support ACF Repeater fields directly. Dynific Addons for Elementor provides the DA – ACF Repeater widget specifically to handle this, giving you full visual control over how repeater data displays in Elementor.
Display Your Repeater Data in Elementor With Dynific Addons
Setting up the ACF Repeater is only half the picture. The other half is how it looks on the front end. Dynific Addons for Elementor gives you the DA – ACF Repeater widget with grid, carousel, accordion, and tabs display options for any Repeater field, all designed visually inside Elementor with no code involved. If you are using ACF Pro on an Elementor site, Dynific Addons is the most direct path from repeater data to a styled, publish-ready layout.
Checkout: How To Create a FAQ Section using ACF Repeater Field?